
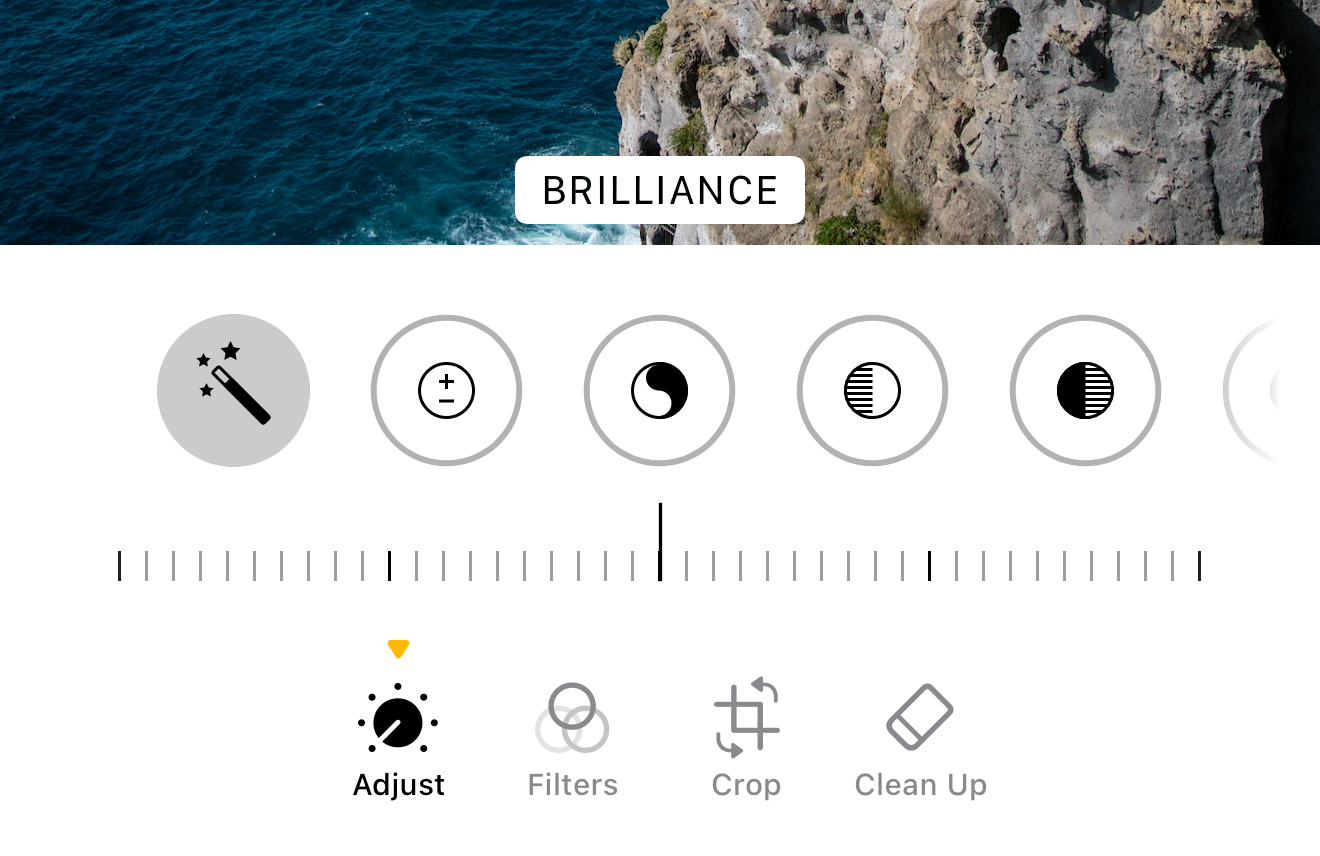
iPhone Photo Editing Settings Explained (Photos App “Adjust” Sliders)
If you’ve ever opened a photo on your iPhone, tapped Edit, and then hit Adjust, you’ve seen a row of sliders that can turn a “meh” photo into something you actually want to share. The problem is that the names aren’t always obvious, and several sliders sound like they do the same thing until you understand what each one is really changing.
This guide walks through every slider you’ll find in the Photos app’s Adjust panel, one by one, in the same spirit as Apple’s editor: small, precise changes that add up to a great result.
To get there: open a photo in Photos → tap Edit → tap Adjust → then swipe through the available controls and drag the slider to fine-tune.
Auto
Auto applies Apple’s suggested combination of adjustments (often a mix of light, contrast, and color) and then lets you control the strength with a slider. It's a fast starting point for editing your photo, especially when you’re editing lots of photos and want a consistent baseline before you fine-tune manually.
When to use this setting: use Auto when you want a quick improvement and you’re not sure where to start, then refine the individual sliders afterward.
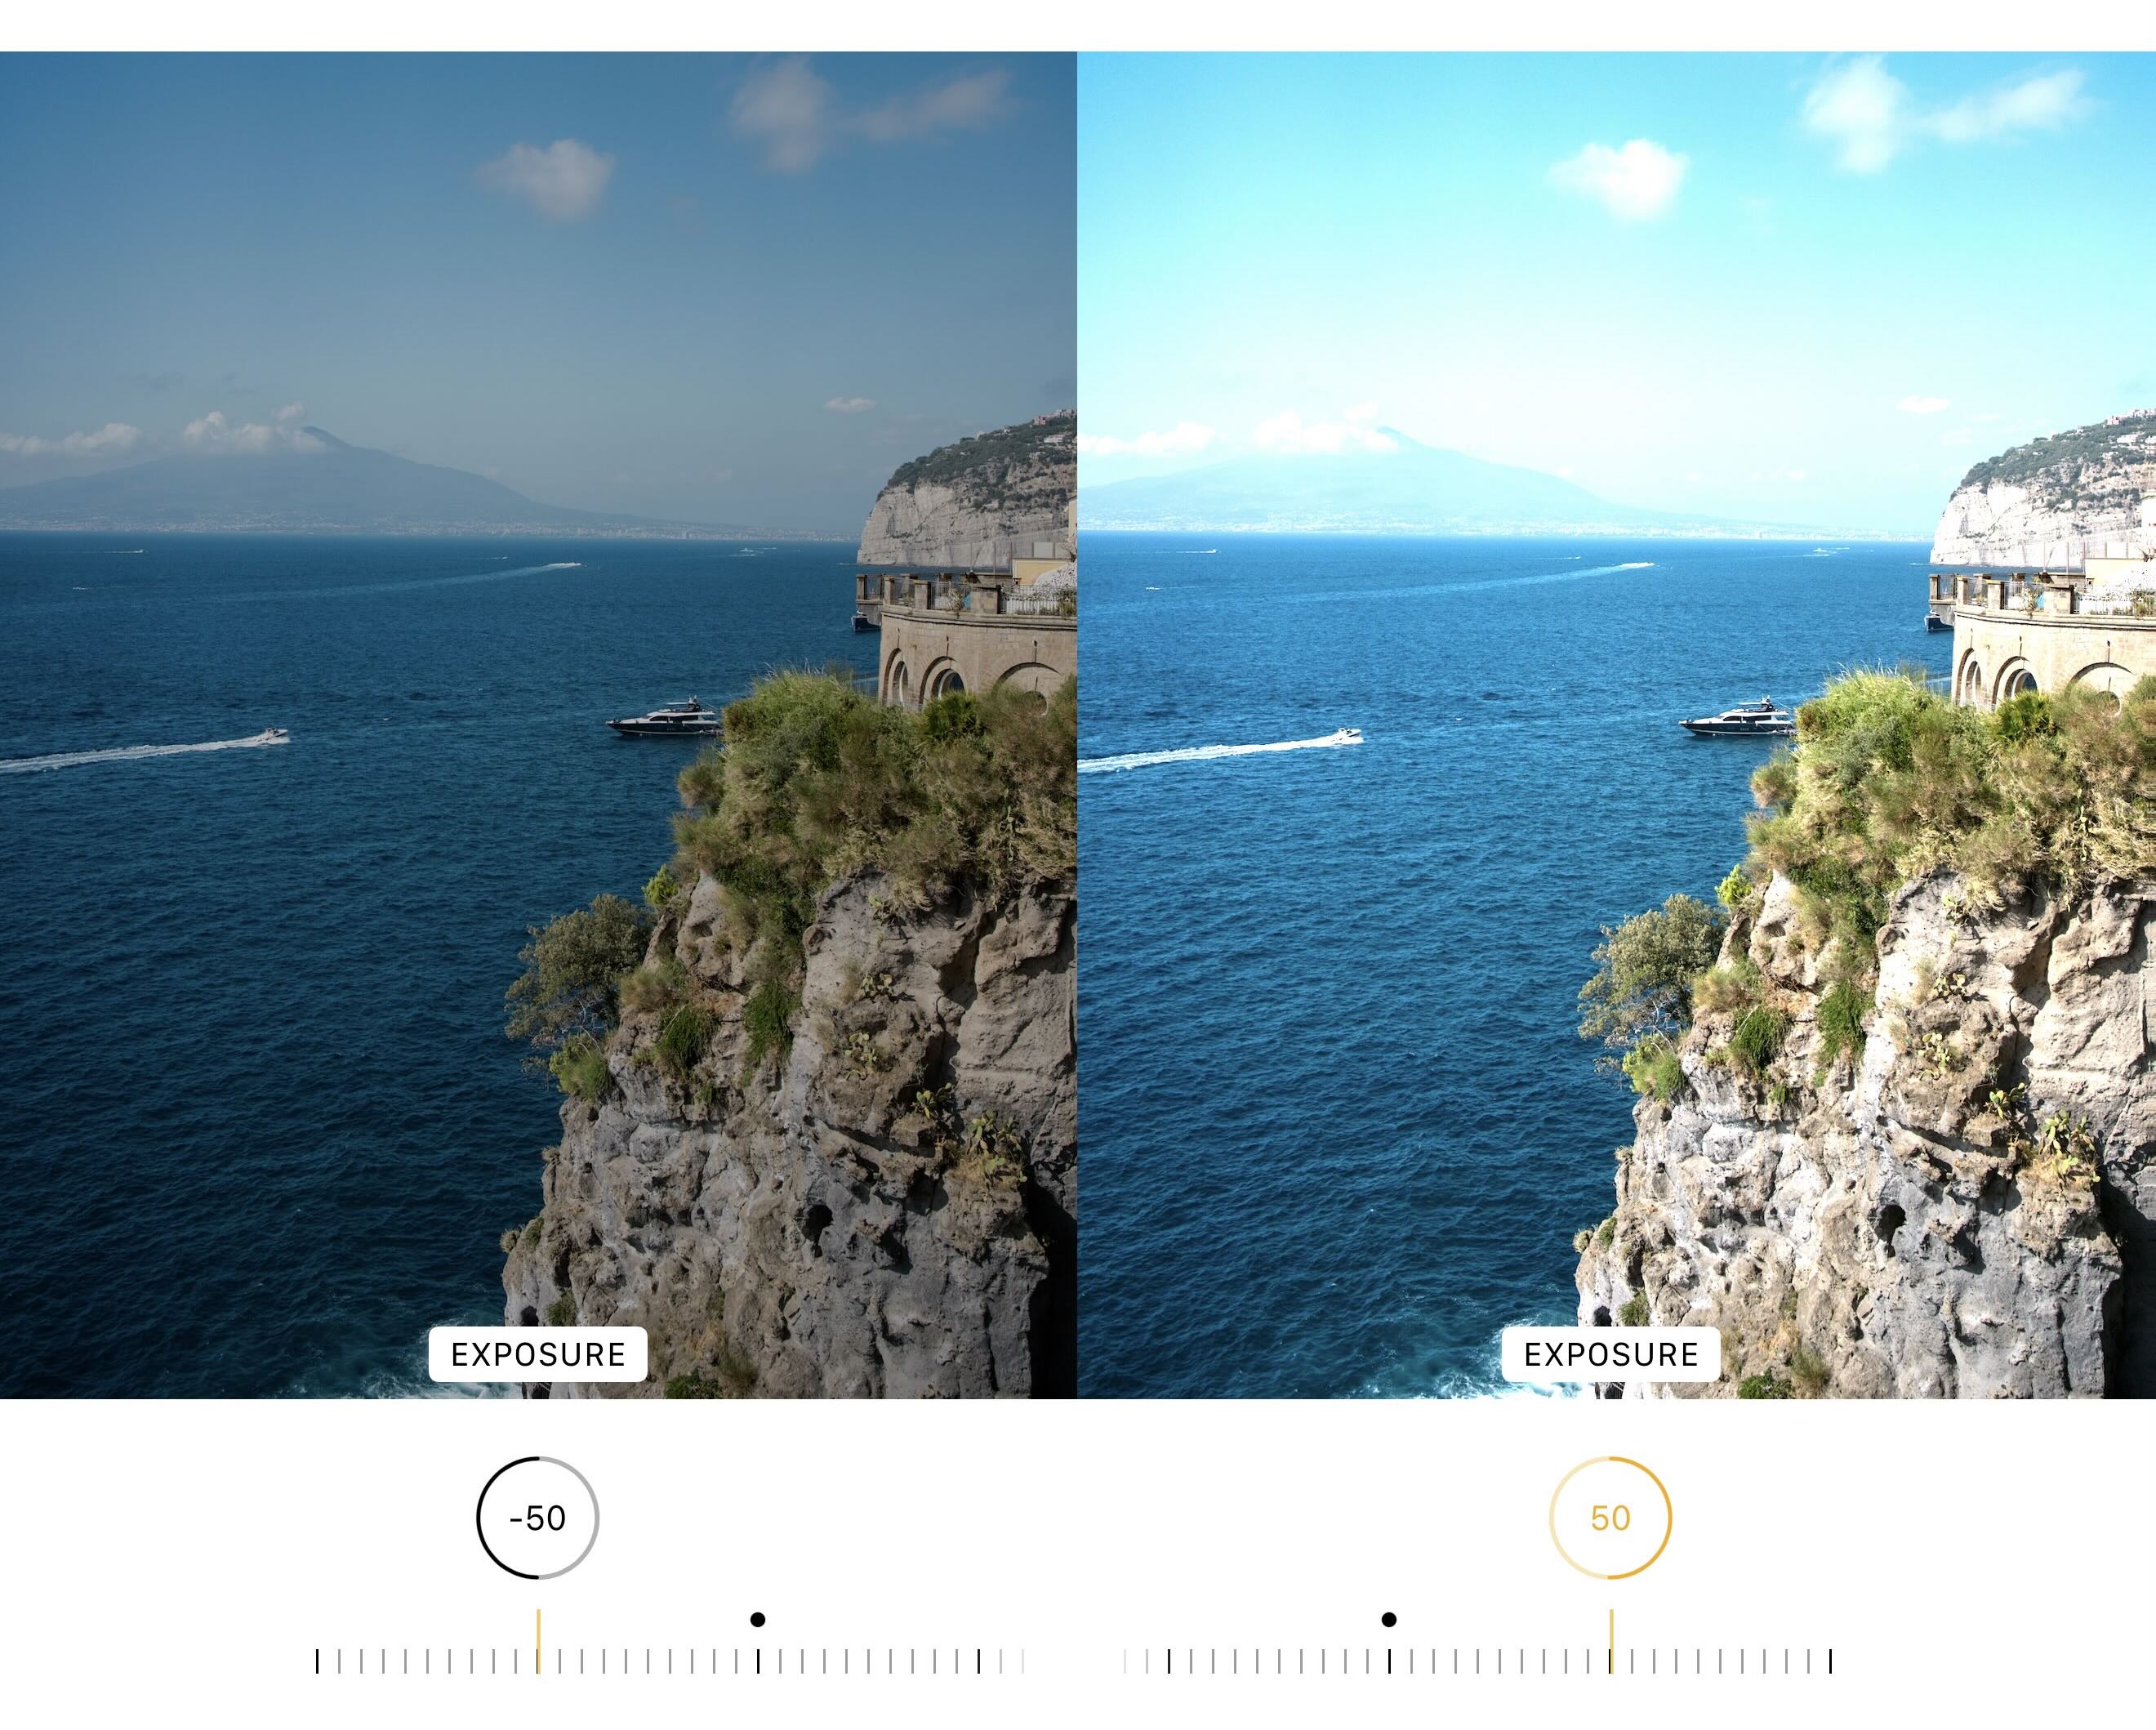
Exposure
Exposure raises or lowers the overall “light level” of the image. Increasing exposure makes the entire photo brighter; decreasing it makes everything darker and can add a moodier feel. The big caution: pushing exposure too far can wash out highlights (bright skies, white shirts) or crush detail in shadows.
When to use this setting: use Exposure when the photo is globally too dark or too bright and needs a broad correction.
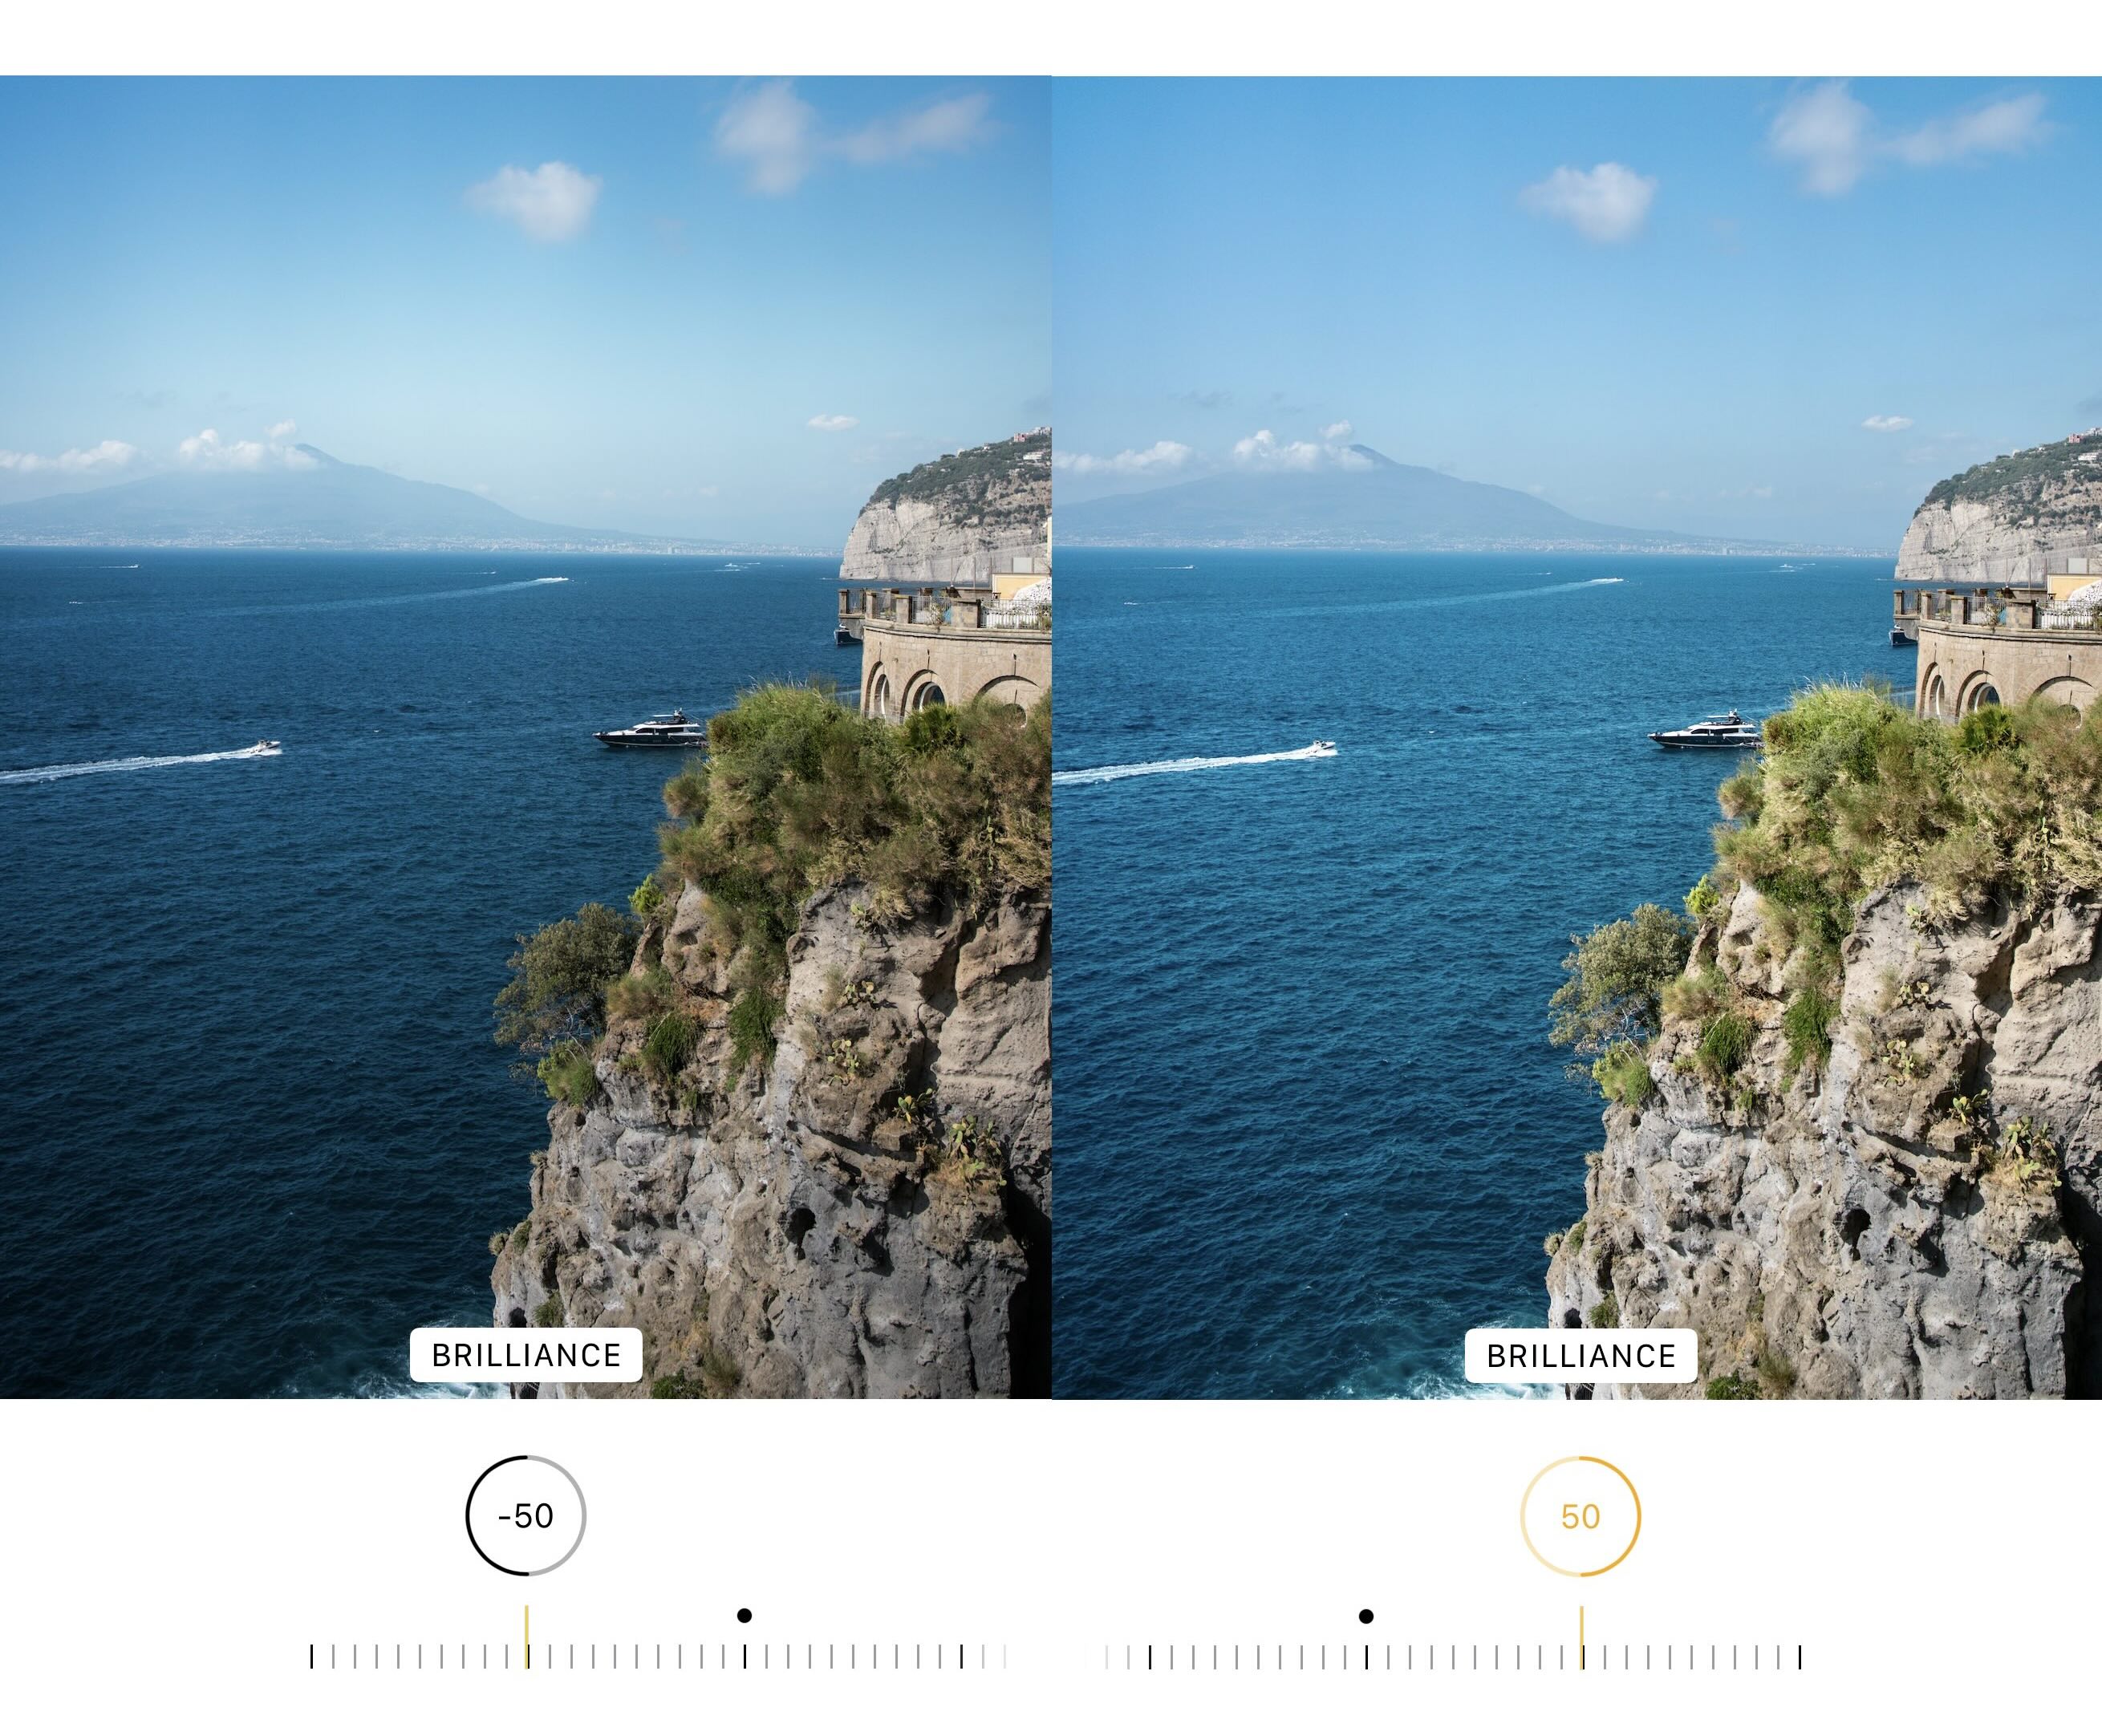
Brilliance
Brilliance is a smart, “colour-neutral” style boost that tends to lift detail in darker areas while also balancing highlight detail and adding a touch of contrast, often making the image feel richer without screaming “edited.” If Exposure feels too blunt, Brilliance often gives you a more natural-looking improvement.
When to use this setting: use Brilliance when you want the photo to look more vivid and detailed without dramatically changing color.
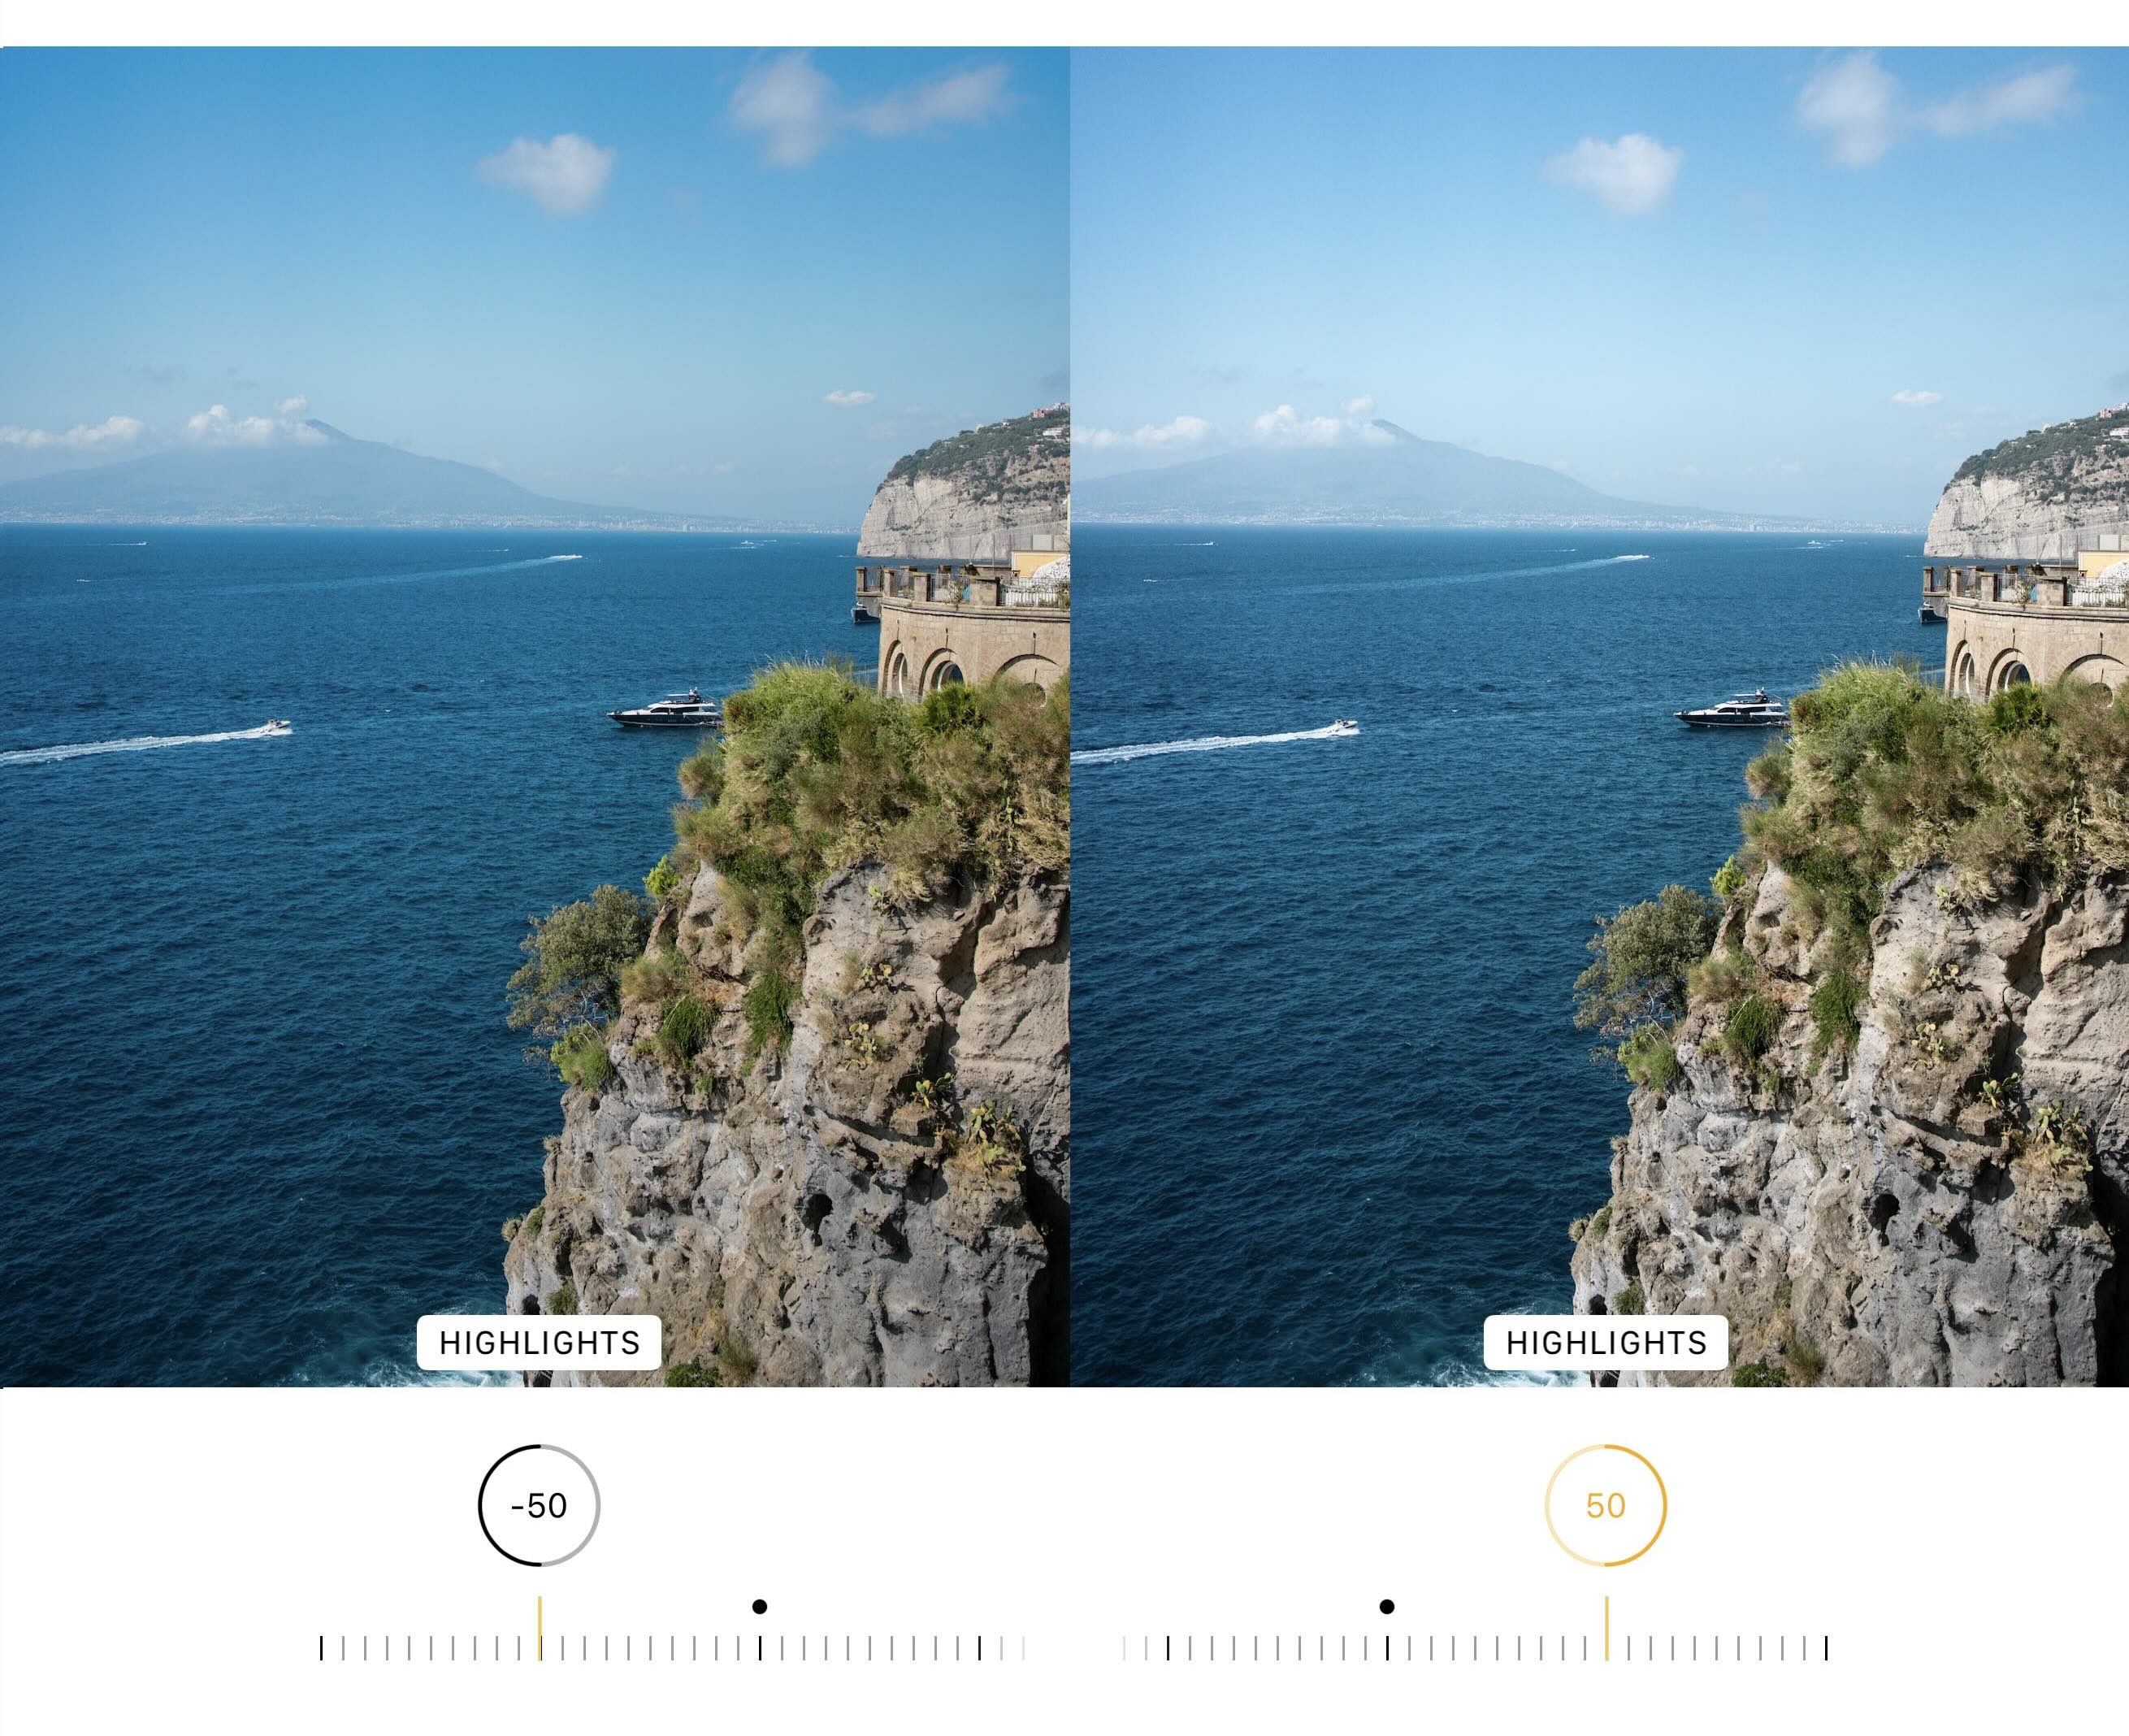
Highlights
Highlights targets the brightest parts of the image. Lowering Highlights can pull back detail in bright skies, reflective surfaces, snow, or overexposed faces; raising it can make bright areas pop more (sometimes at the cost of detail). Think of it as “bright detail control.”
When to use this setting: use Highlights when the bright areas look blown out or distracting and you want to recover detail.
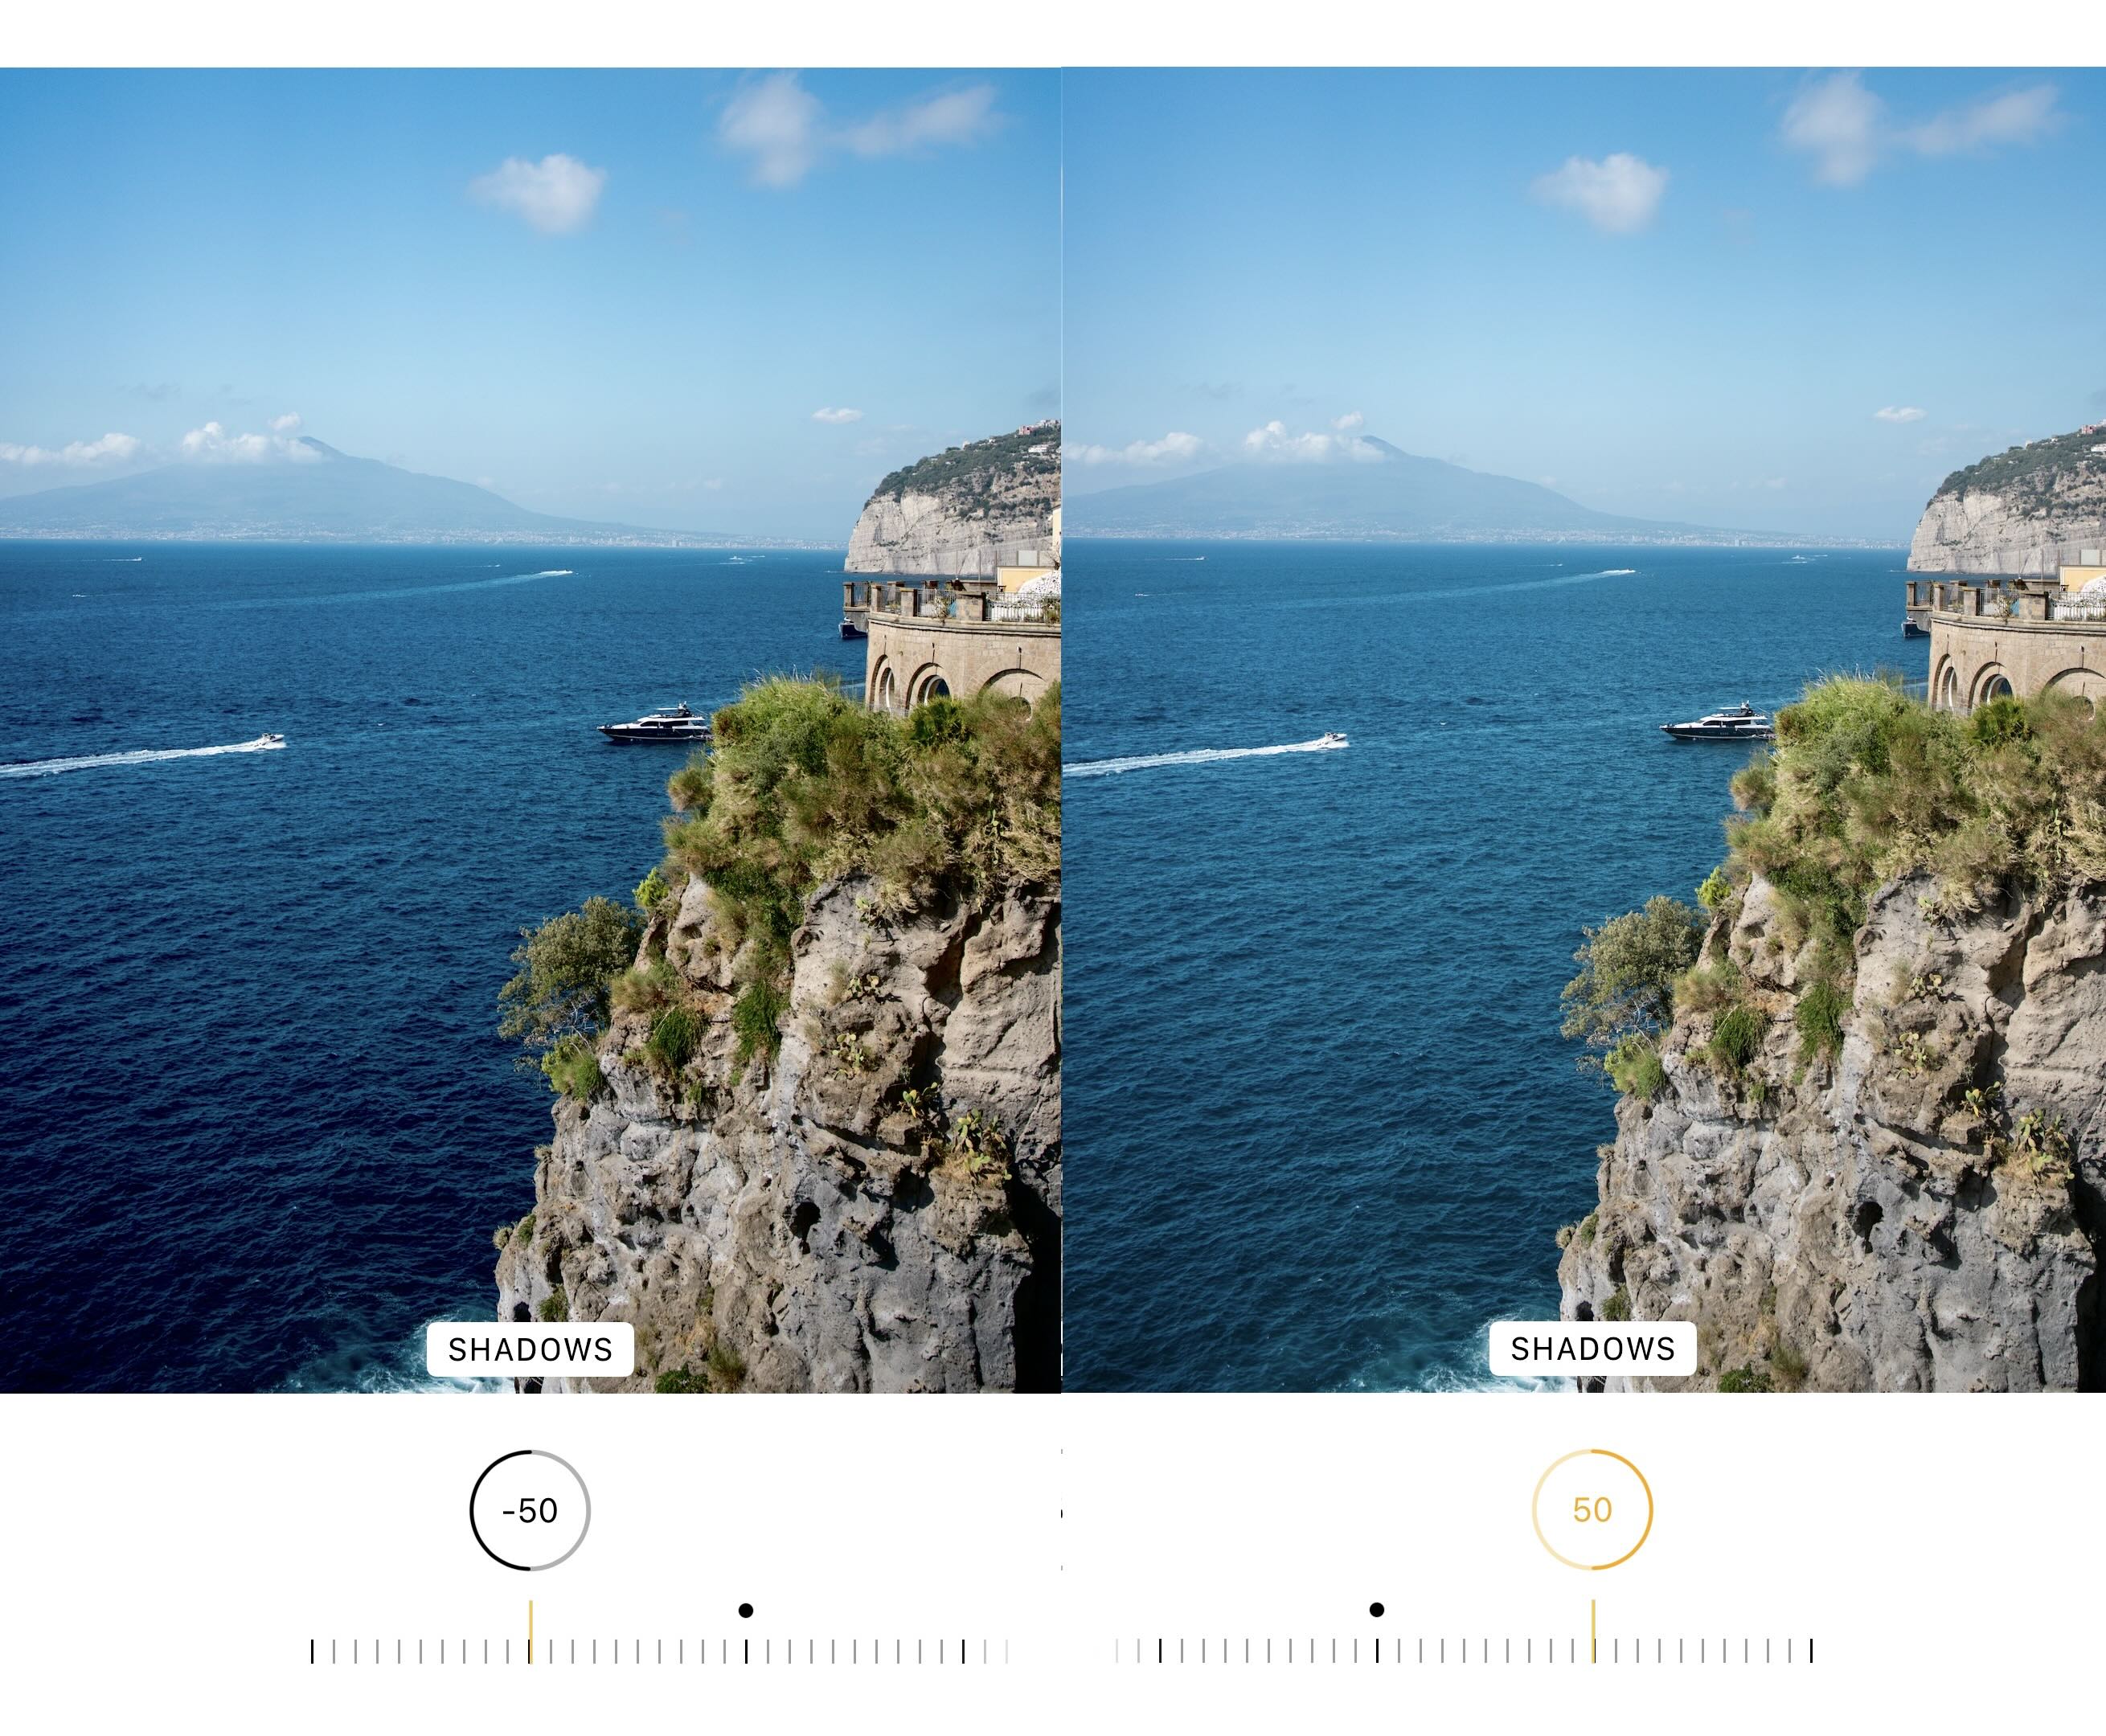
Shadows
Shadows targets the darker parts of the image. Raising Shadows reveals hidden detail (like a face under a hat brim or a room interior near a window). Lowering Shadows deepens dark tones for a punchier, more dramatic look. Overdoing it can make photos look flat or “HDR-ish.”
When to use this setting: use Shadows when important details are buried in dark areas or when you want stronger depth by deepening shadows.
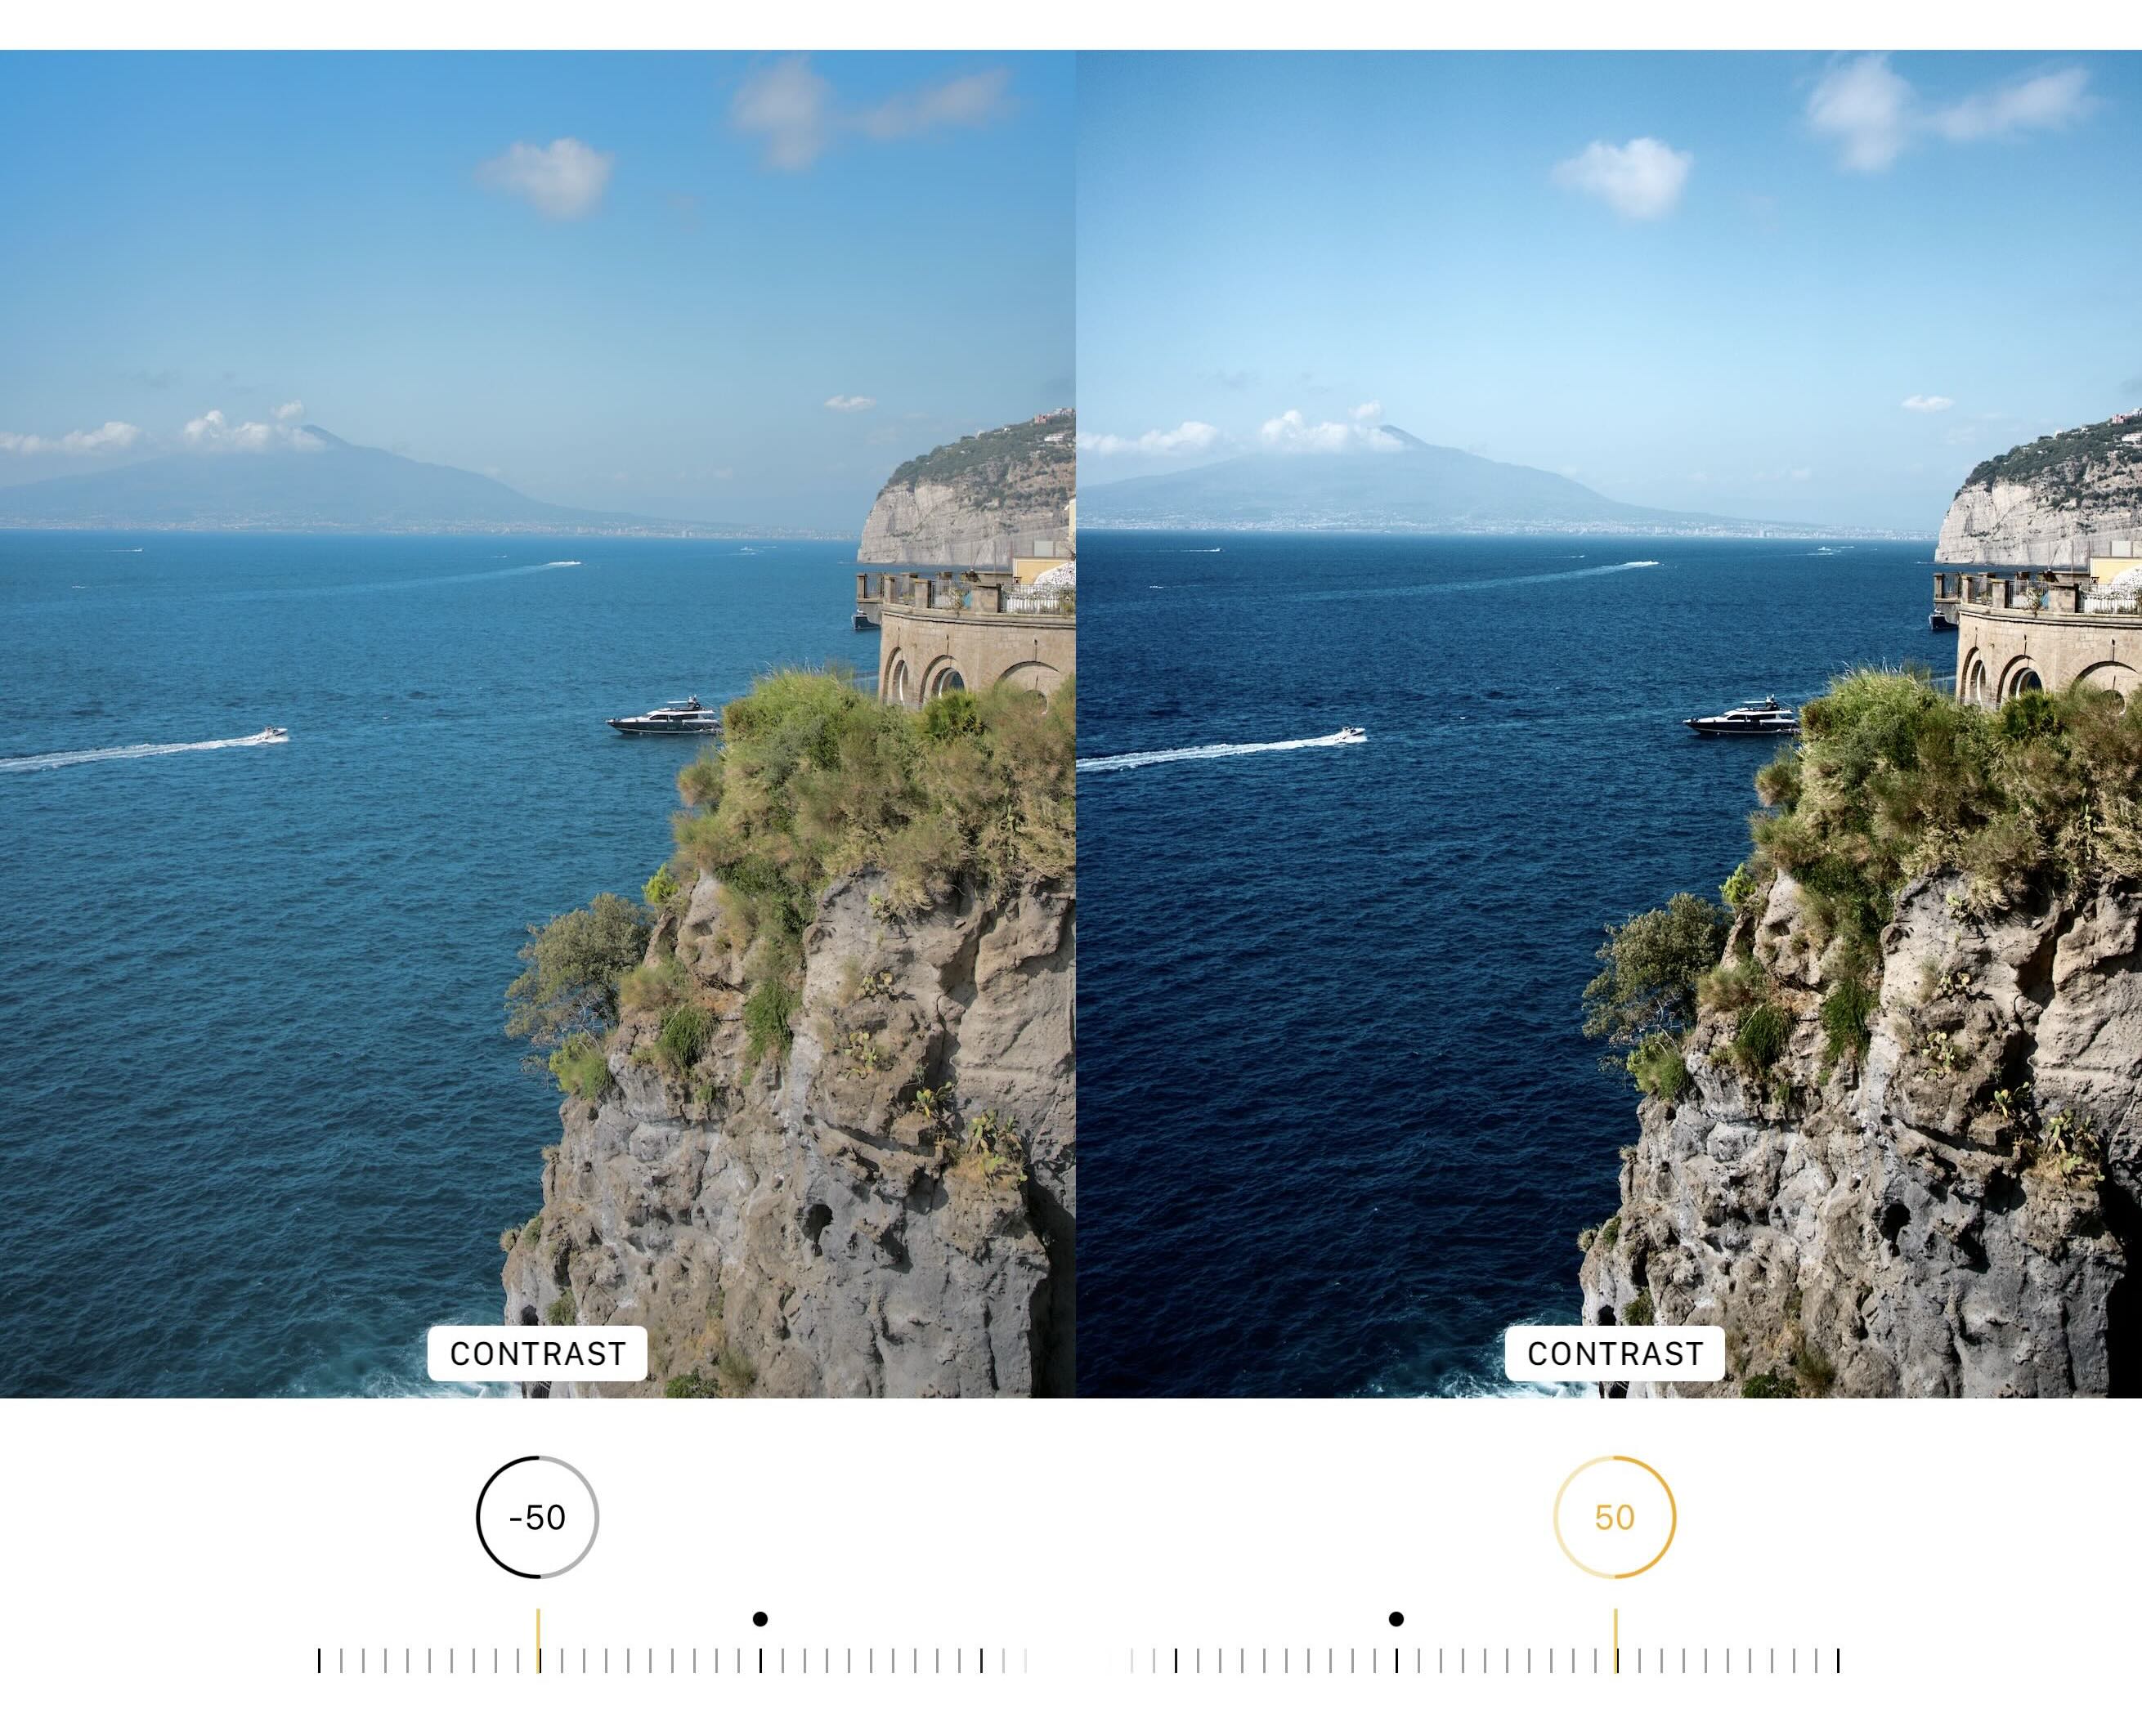
Contrast
Contrast increases (or decreases) the difference between light and dark areas. More contrast gives an image more punch and separation; less contrast makes it softer and flatter (sometimes useful for hazy scenes or a pastel look). If faces look harsh, slightly reducing contrast can be surprisingly flattering.
When to use this setting: use Contrast when the photo looks dull/flat and needs separation, or when it looks too harsh and needs smoothing.
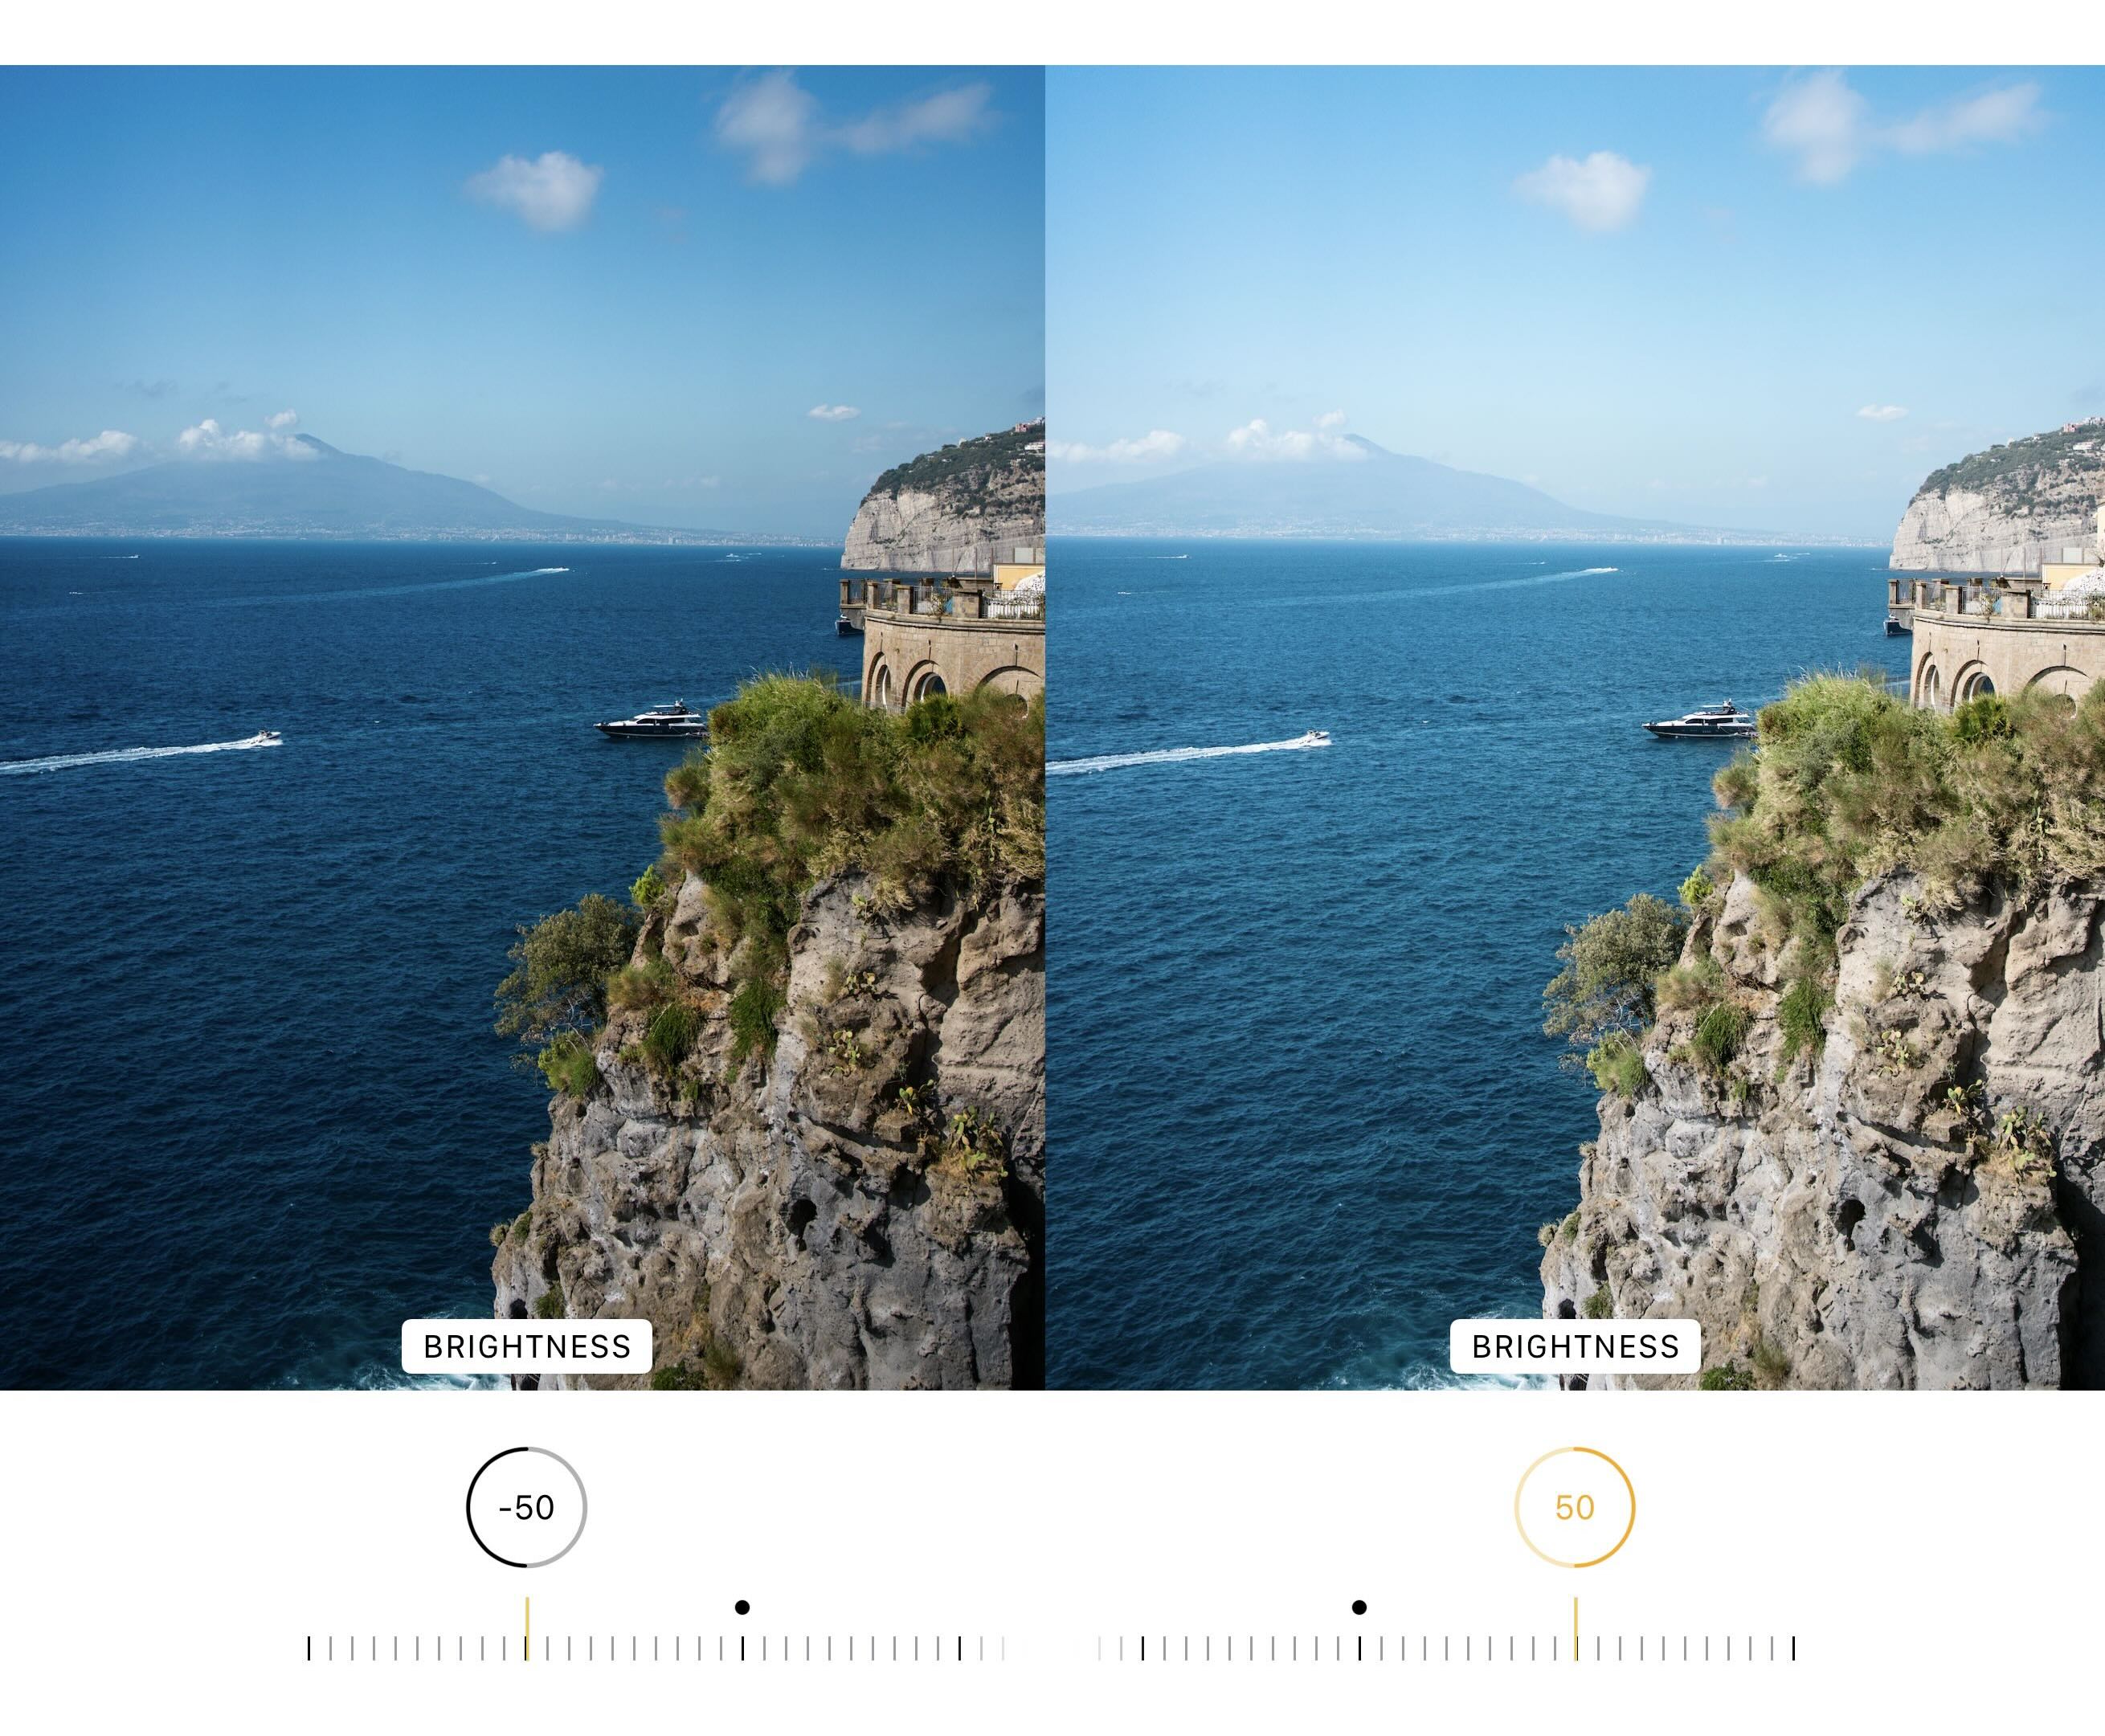
Brightness
Brightness also makes an image lighter or darker, but it typically feels less dramatic than Exposure. A practical way to think about it: Exposure can shift the whole photo’s light “foundation,” while Brightness can be used for a smaller overall lift or dip after you’ve already fixed exposure/highlights/shadows.
When to use this setting: use Brightness for a gentle overall lift after you’ve handled Exposure, Highlights, and Shadows.
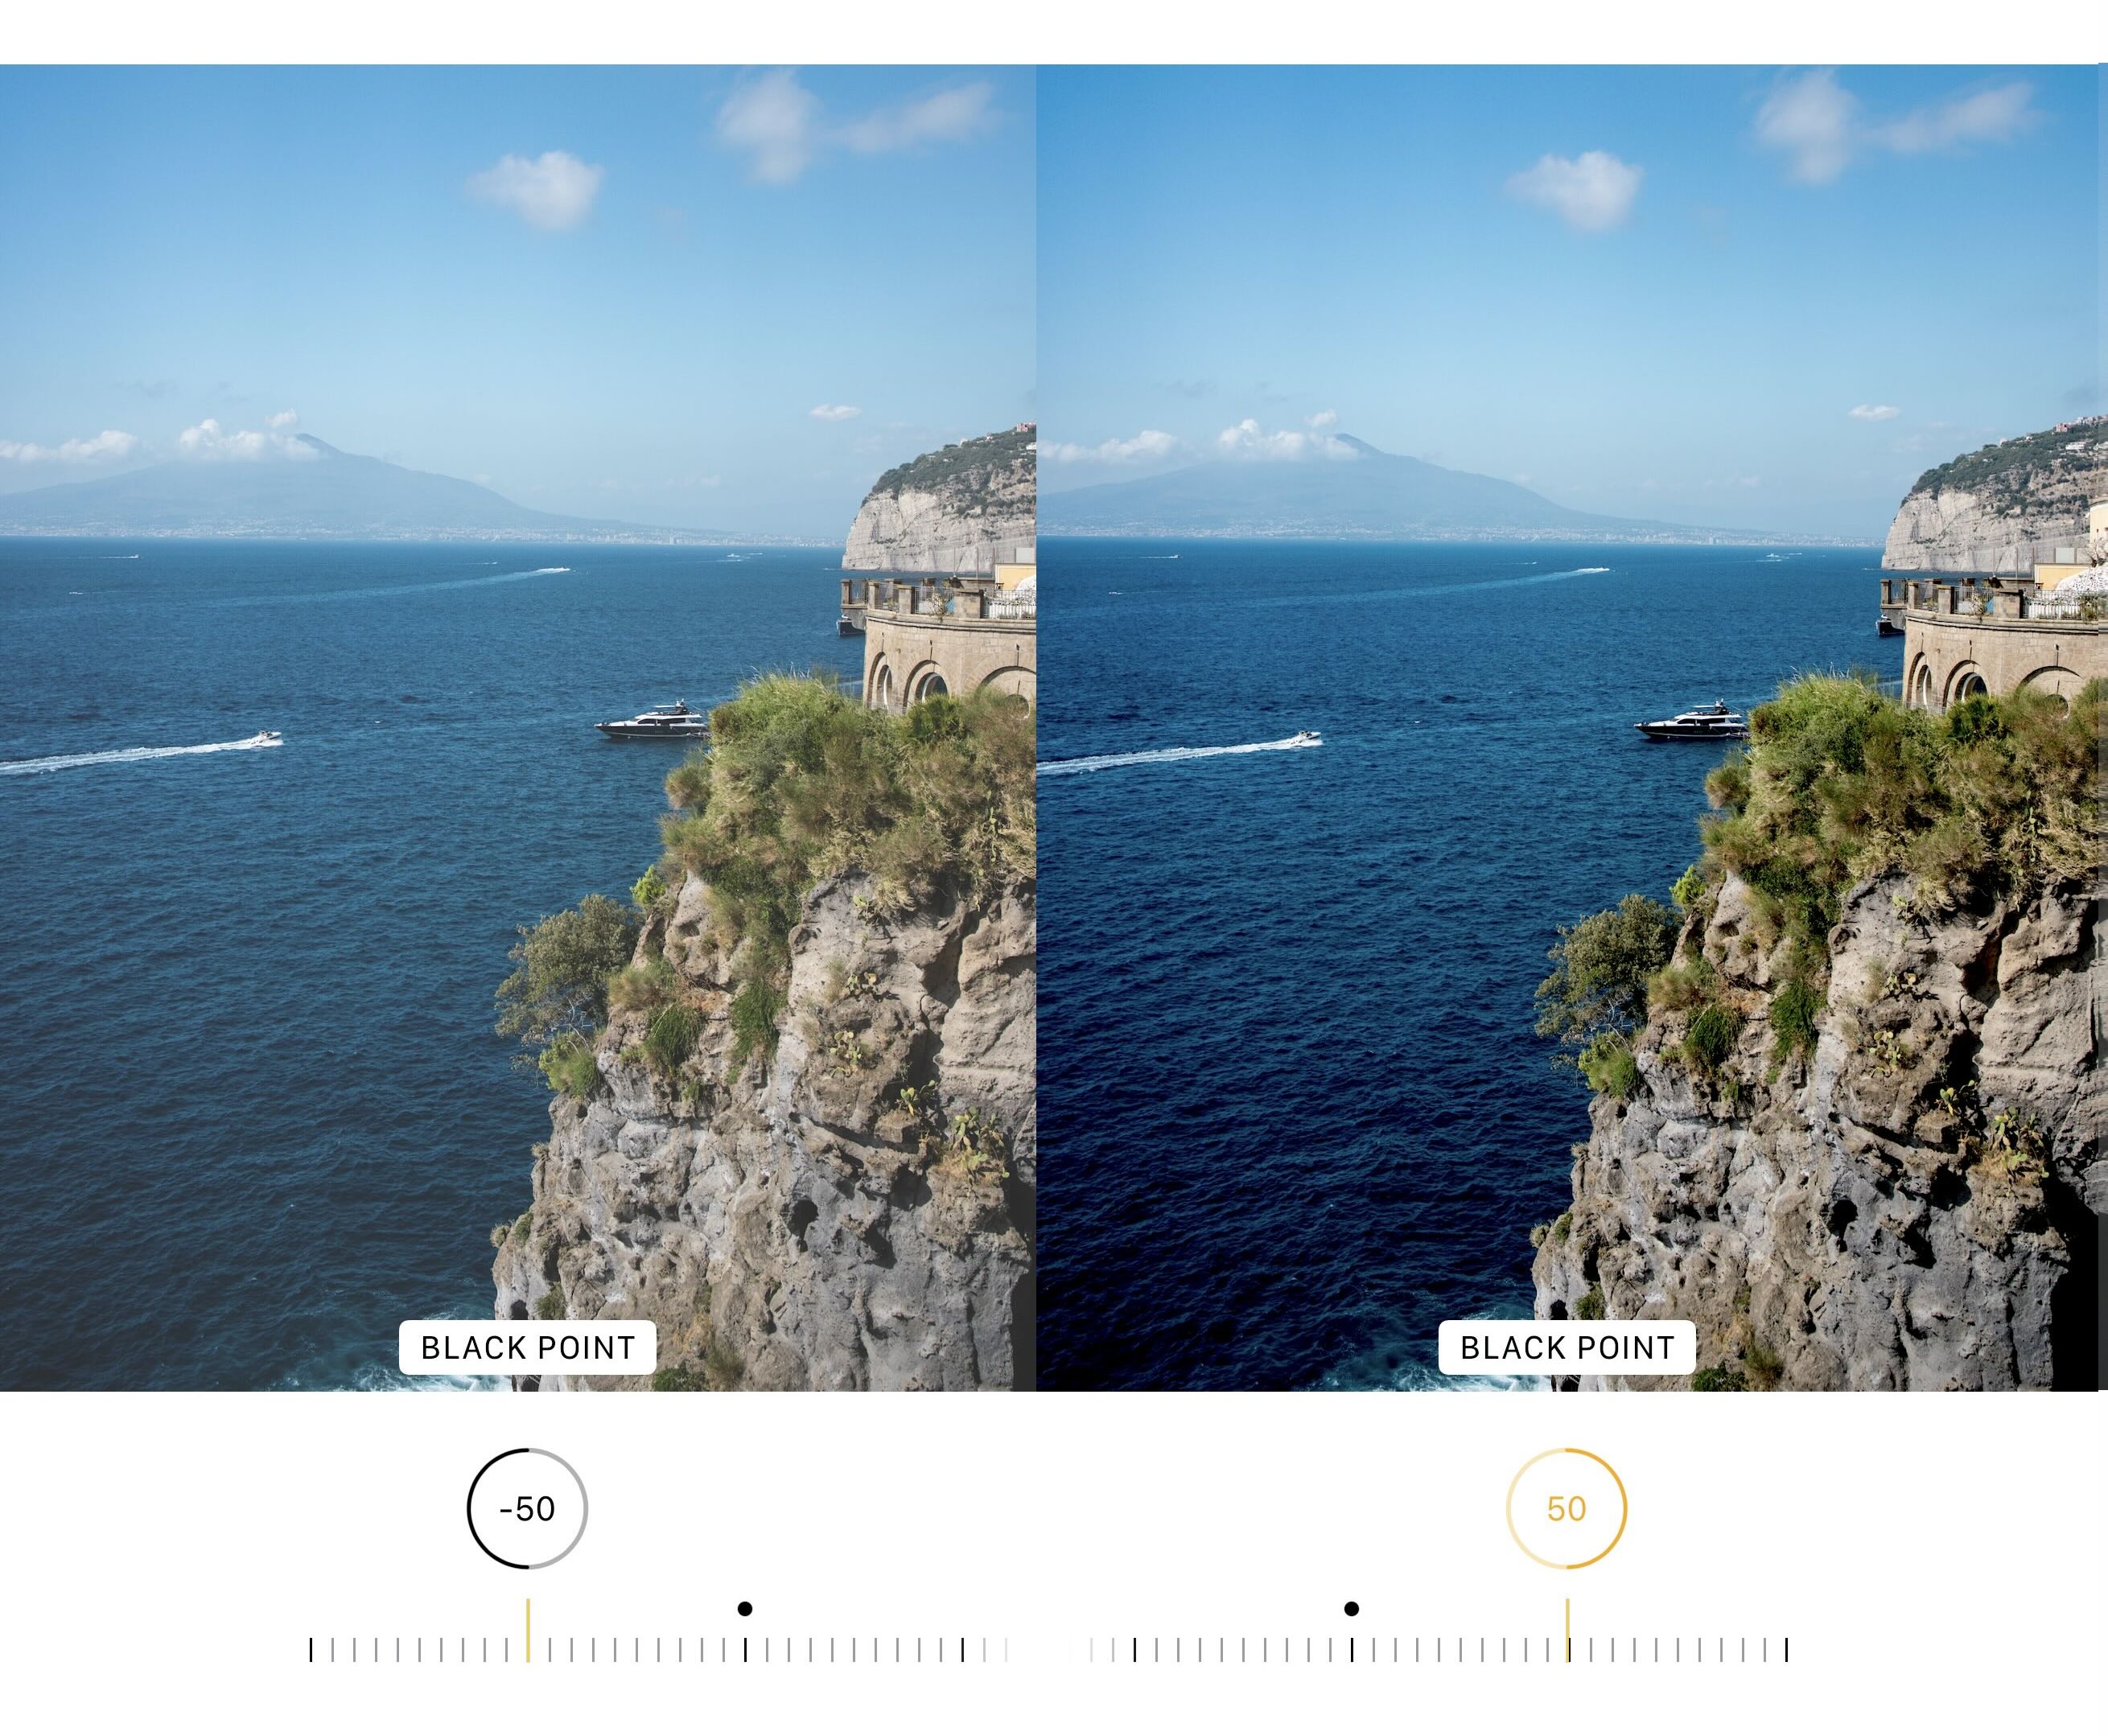
Black Point
Black Point sets how “deep” the darkest tones go. Increasing Black Point makes shadows darker and can add richness and drama; decreasing it lifts the darkest tones so the photo looks more airy (or sometimes washed out). This slider is one of the best ways to fix a photo that looks hazy or lacking depth.
When to use this setting: use Black Point when the image looks washed out and you want stronger depth and more solid blacks.
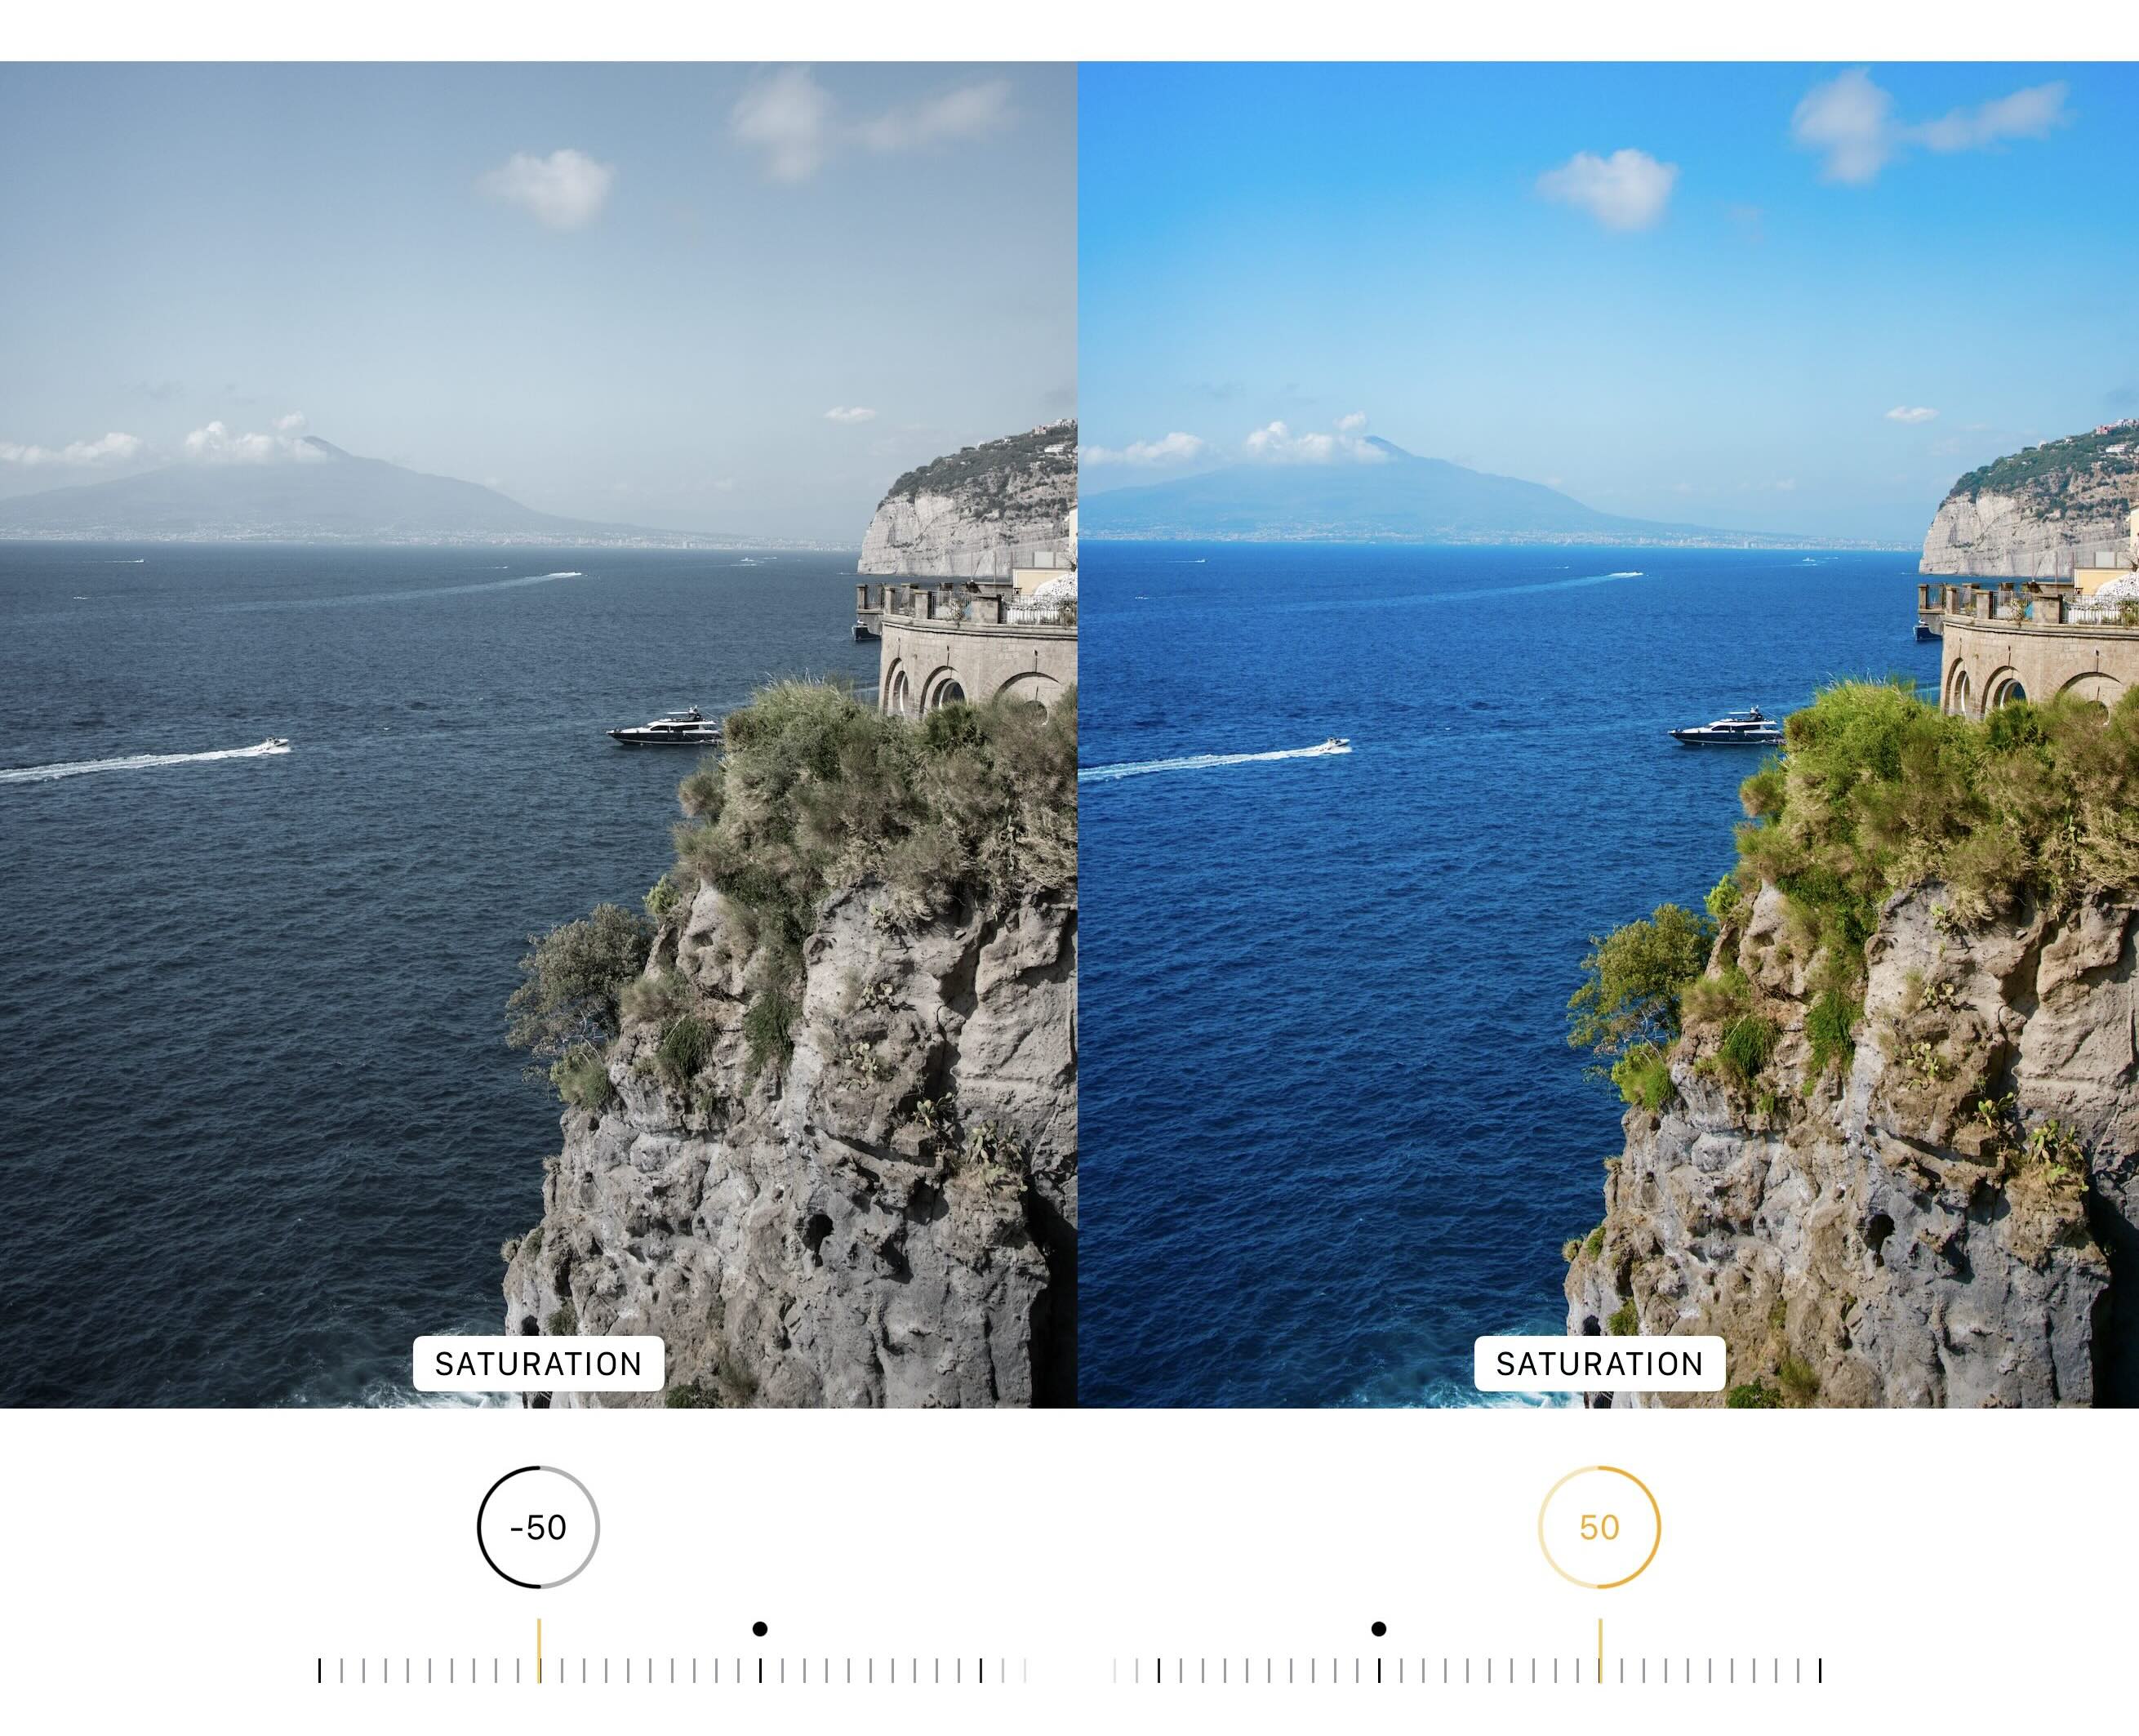
Saturation
Saturation controls overall color intensity across the entire image. Turning it up makes all colors stronger; turning it down makes colours more muted (all the way to black-and-white at the extreme). The downside is that saturation can easily make skin tones look unnatural if pushed too far.
When to use this setting: use Saturation when the entire photo’s colors are too dull or too intense, and you want a broad color shift.
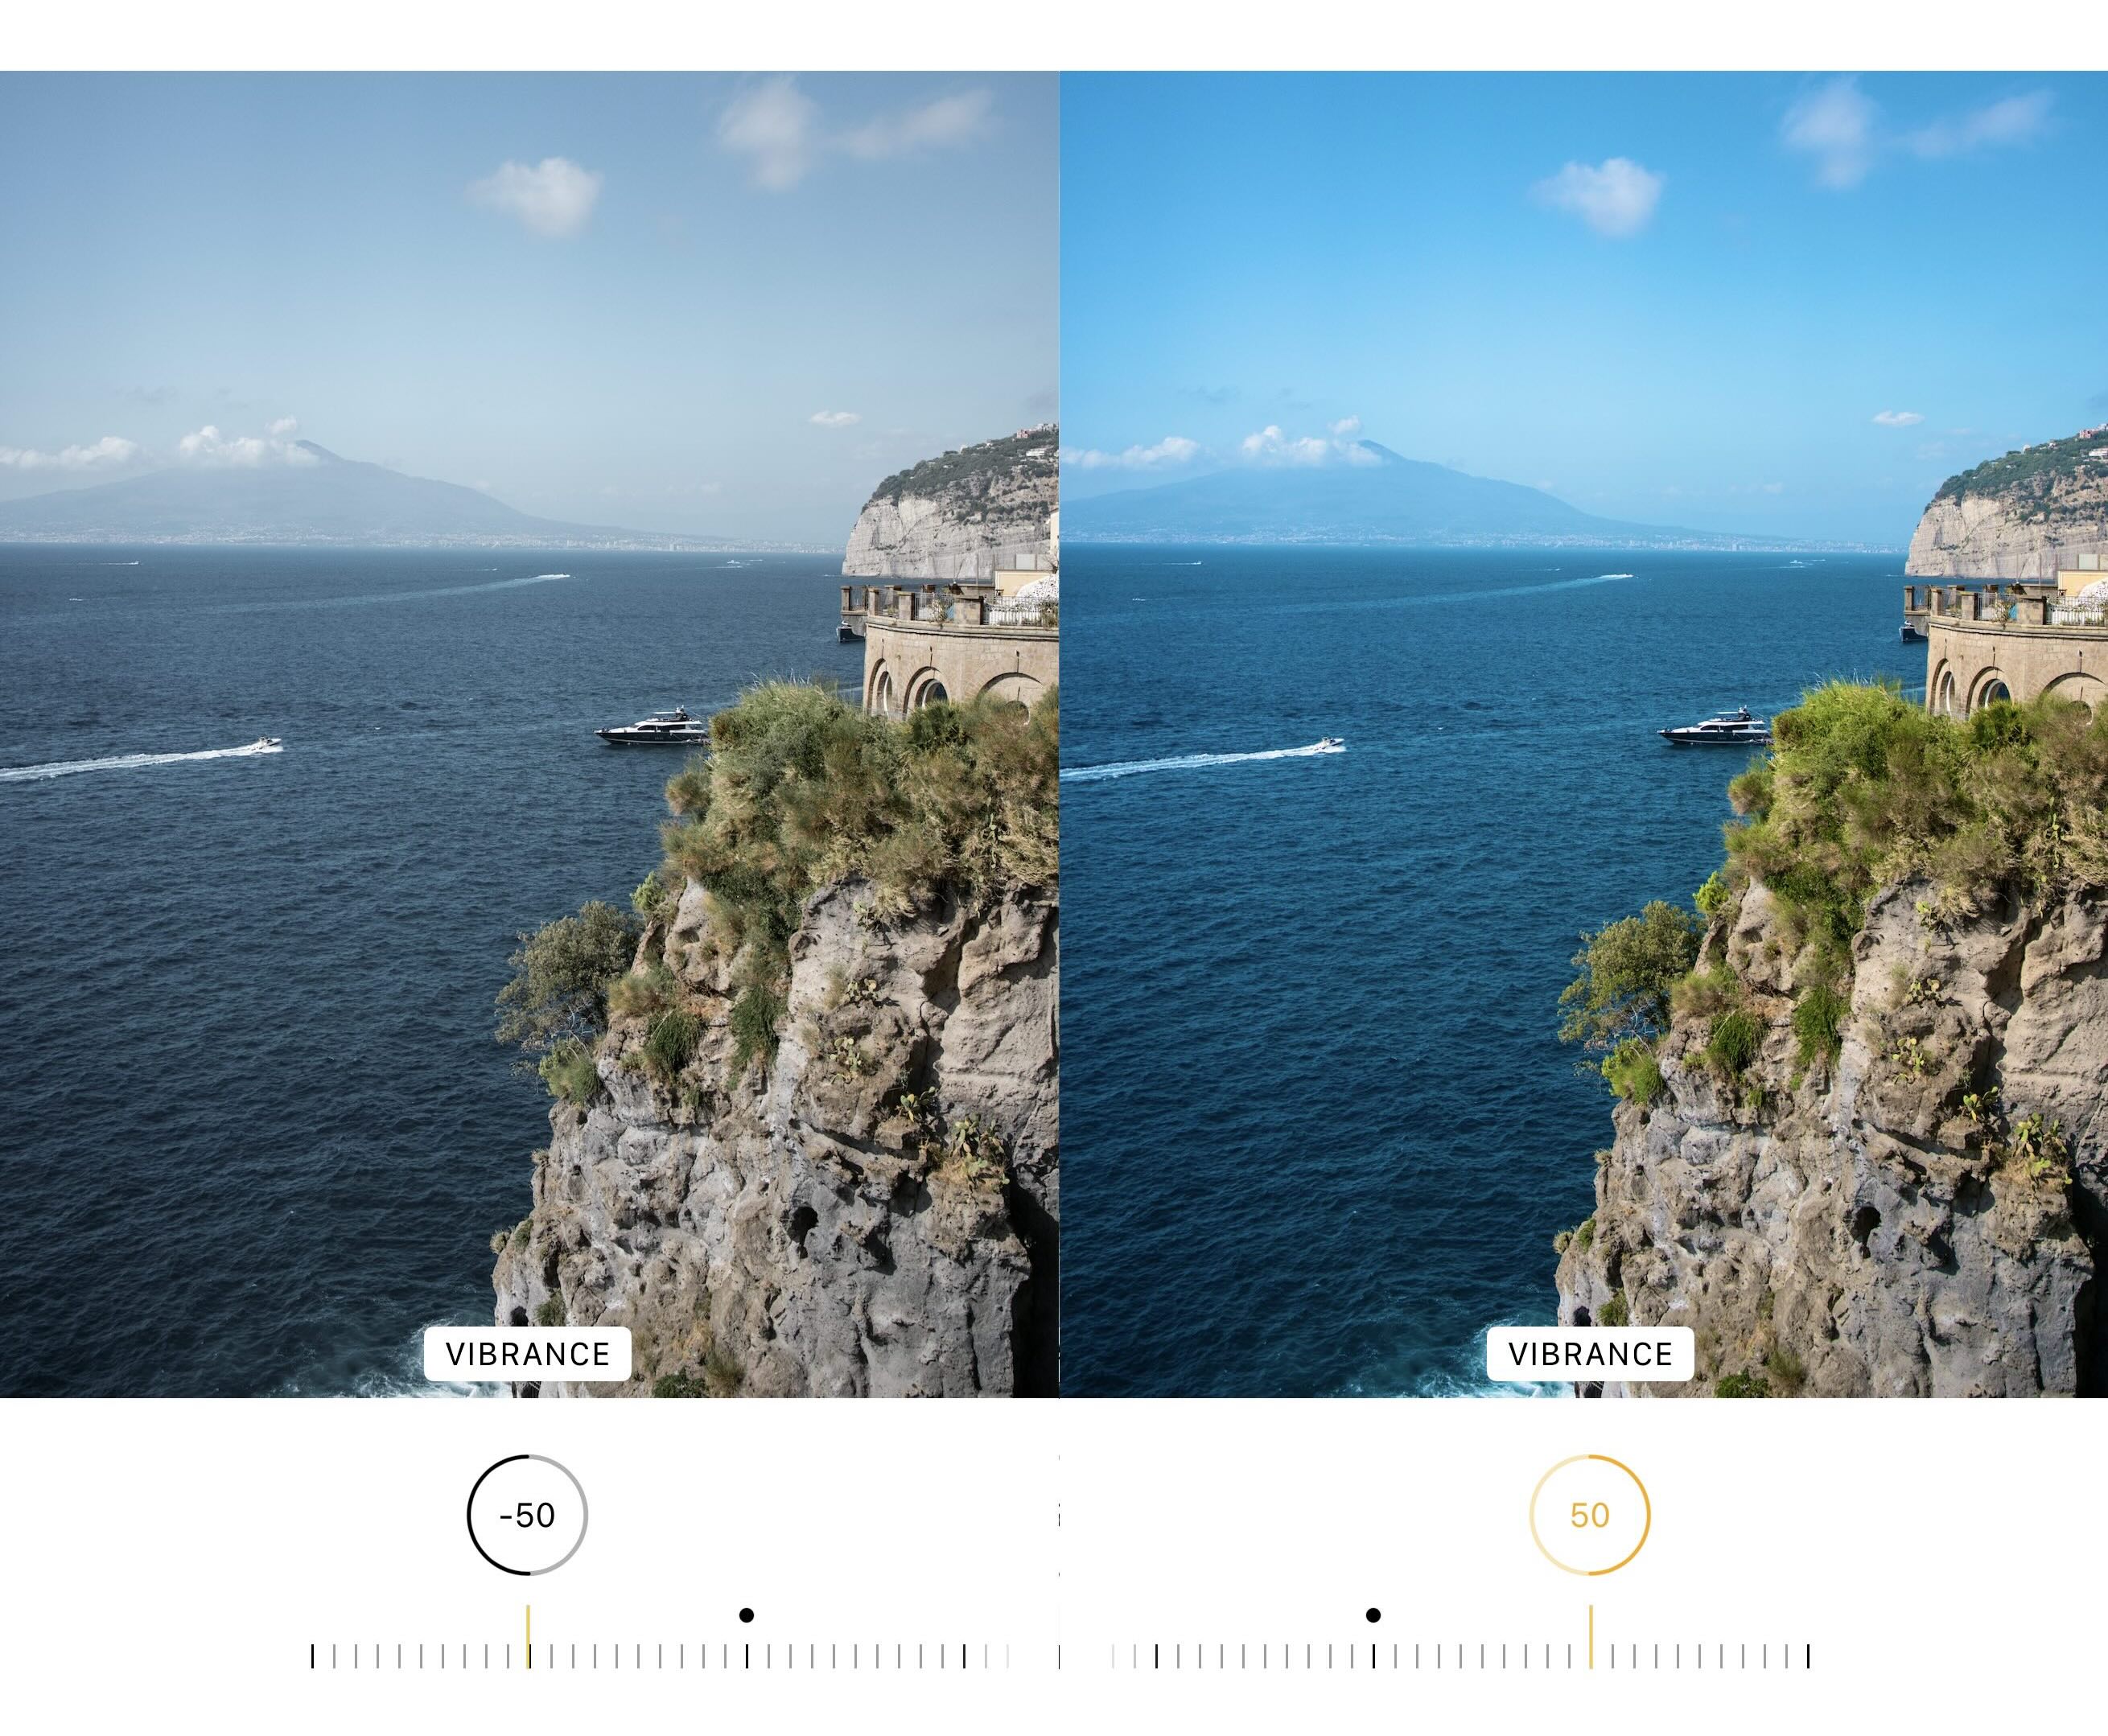
Vibrance
Vibrance is like saturation’s more careful sibling. It boosts color in a more restrained way—often protecting skin tones and already-saturated areas better than the Saturation slider. If you want the photo to look “more colorful” without neon vibes, Vibrance is usually the safer first move.
When to use this setting: use Vibrance when you want richer color but want to keep skin tones and already-strong colors from going overboard.
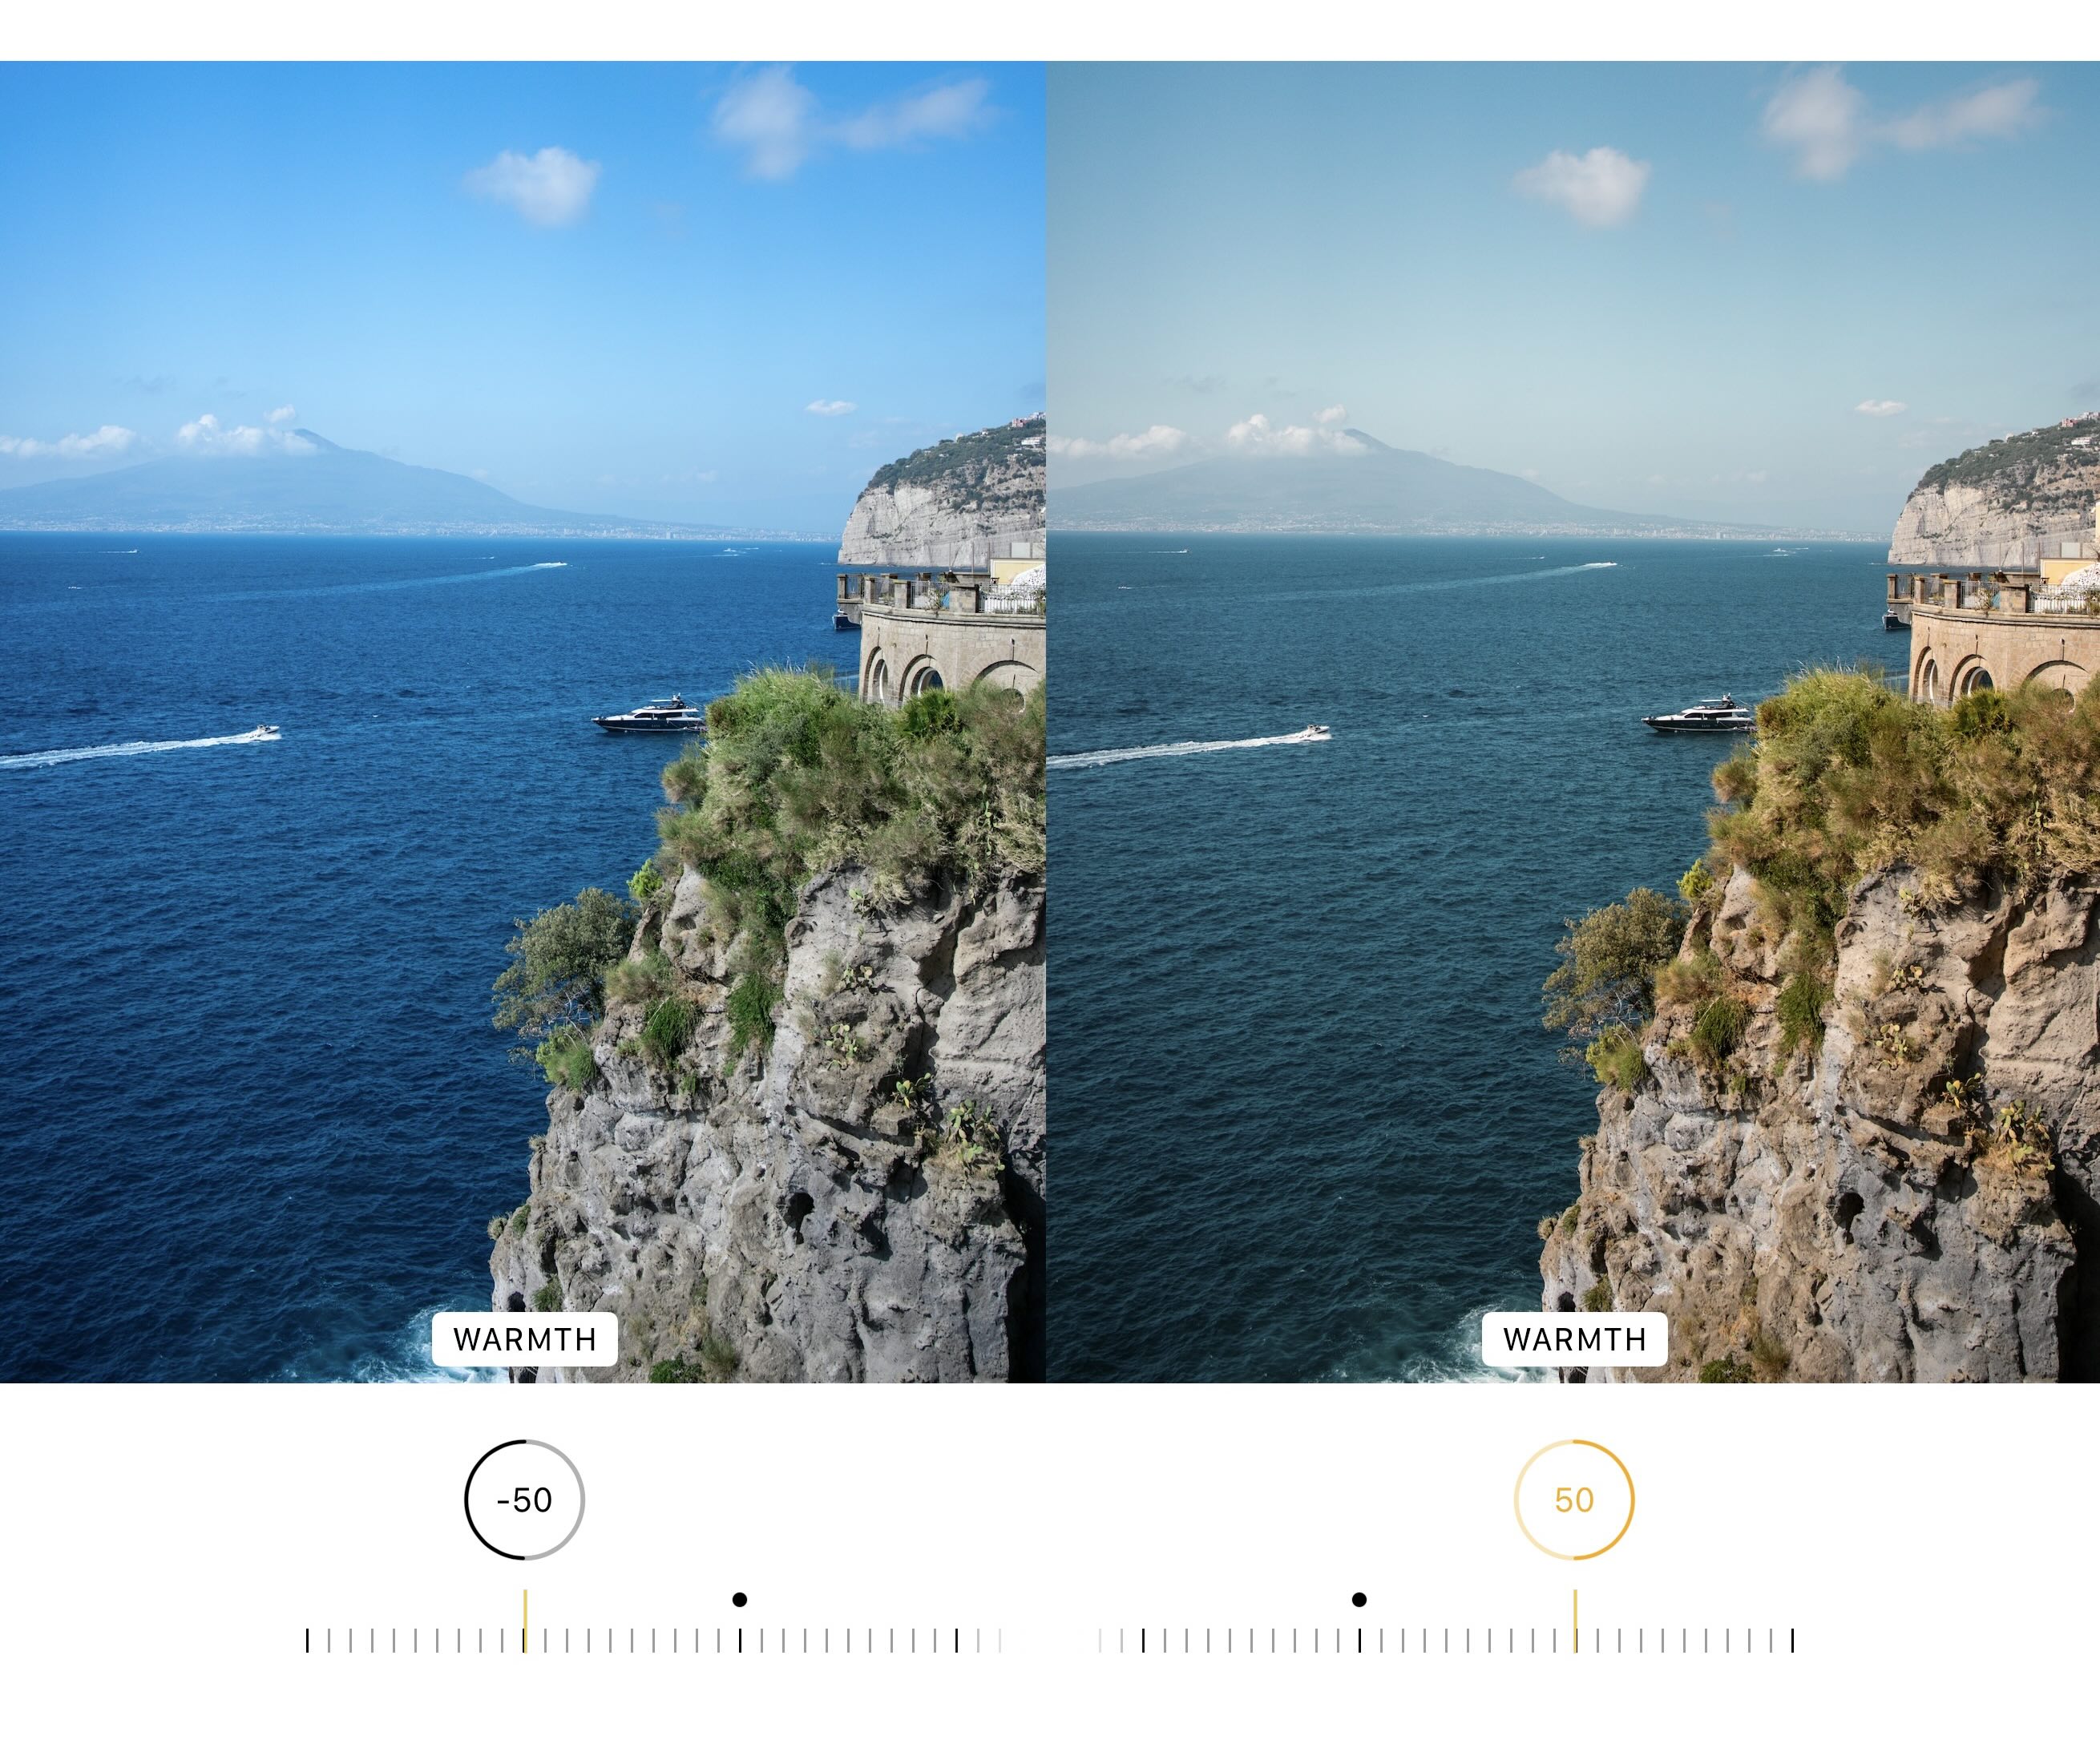
Warmth
Warmth shifts the color temperature. Increasing Warmth adds yellow/orange (cozier, sunset-like); decreasing Warmth adds blue (cooler, cleaner, sometimes more “wintery”). This is a key tool for fixing lighting issues, like making indoor photos feel less yellow, or making cloudy outdoor photos feel less cold.
When to use this setting: use Warmth when the photo’s lighting color feels “off” (too yellow or too blue) and you want a more natural temperature.
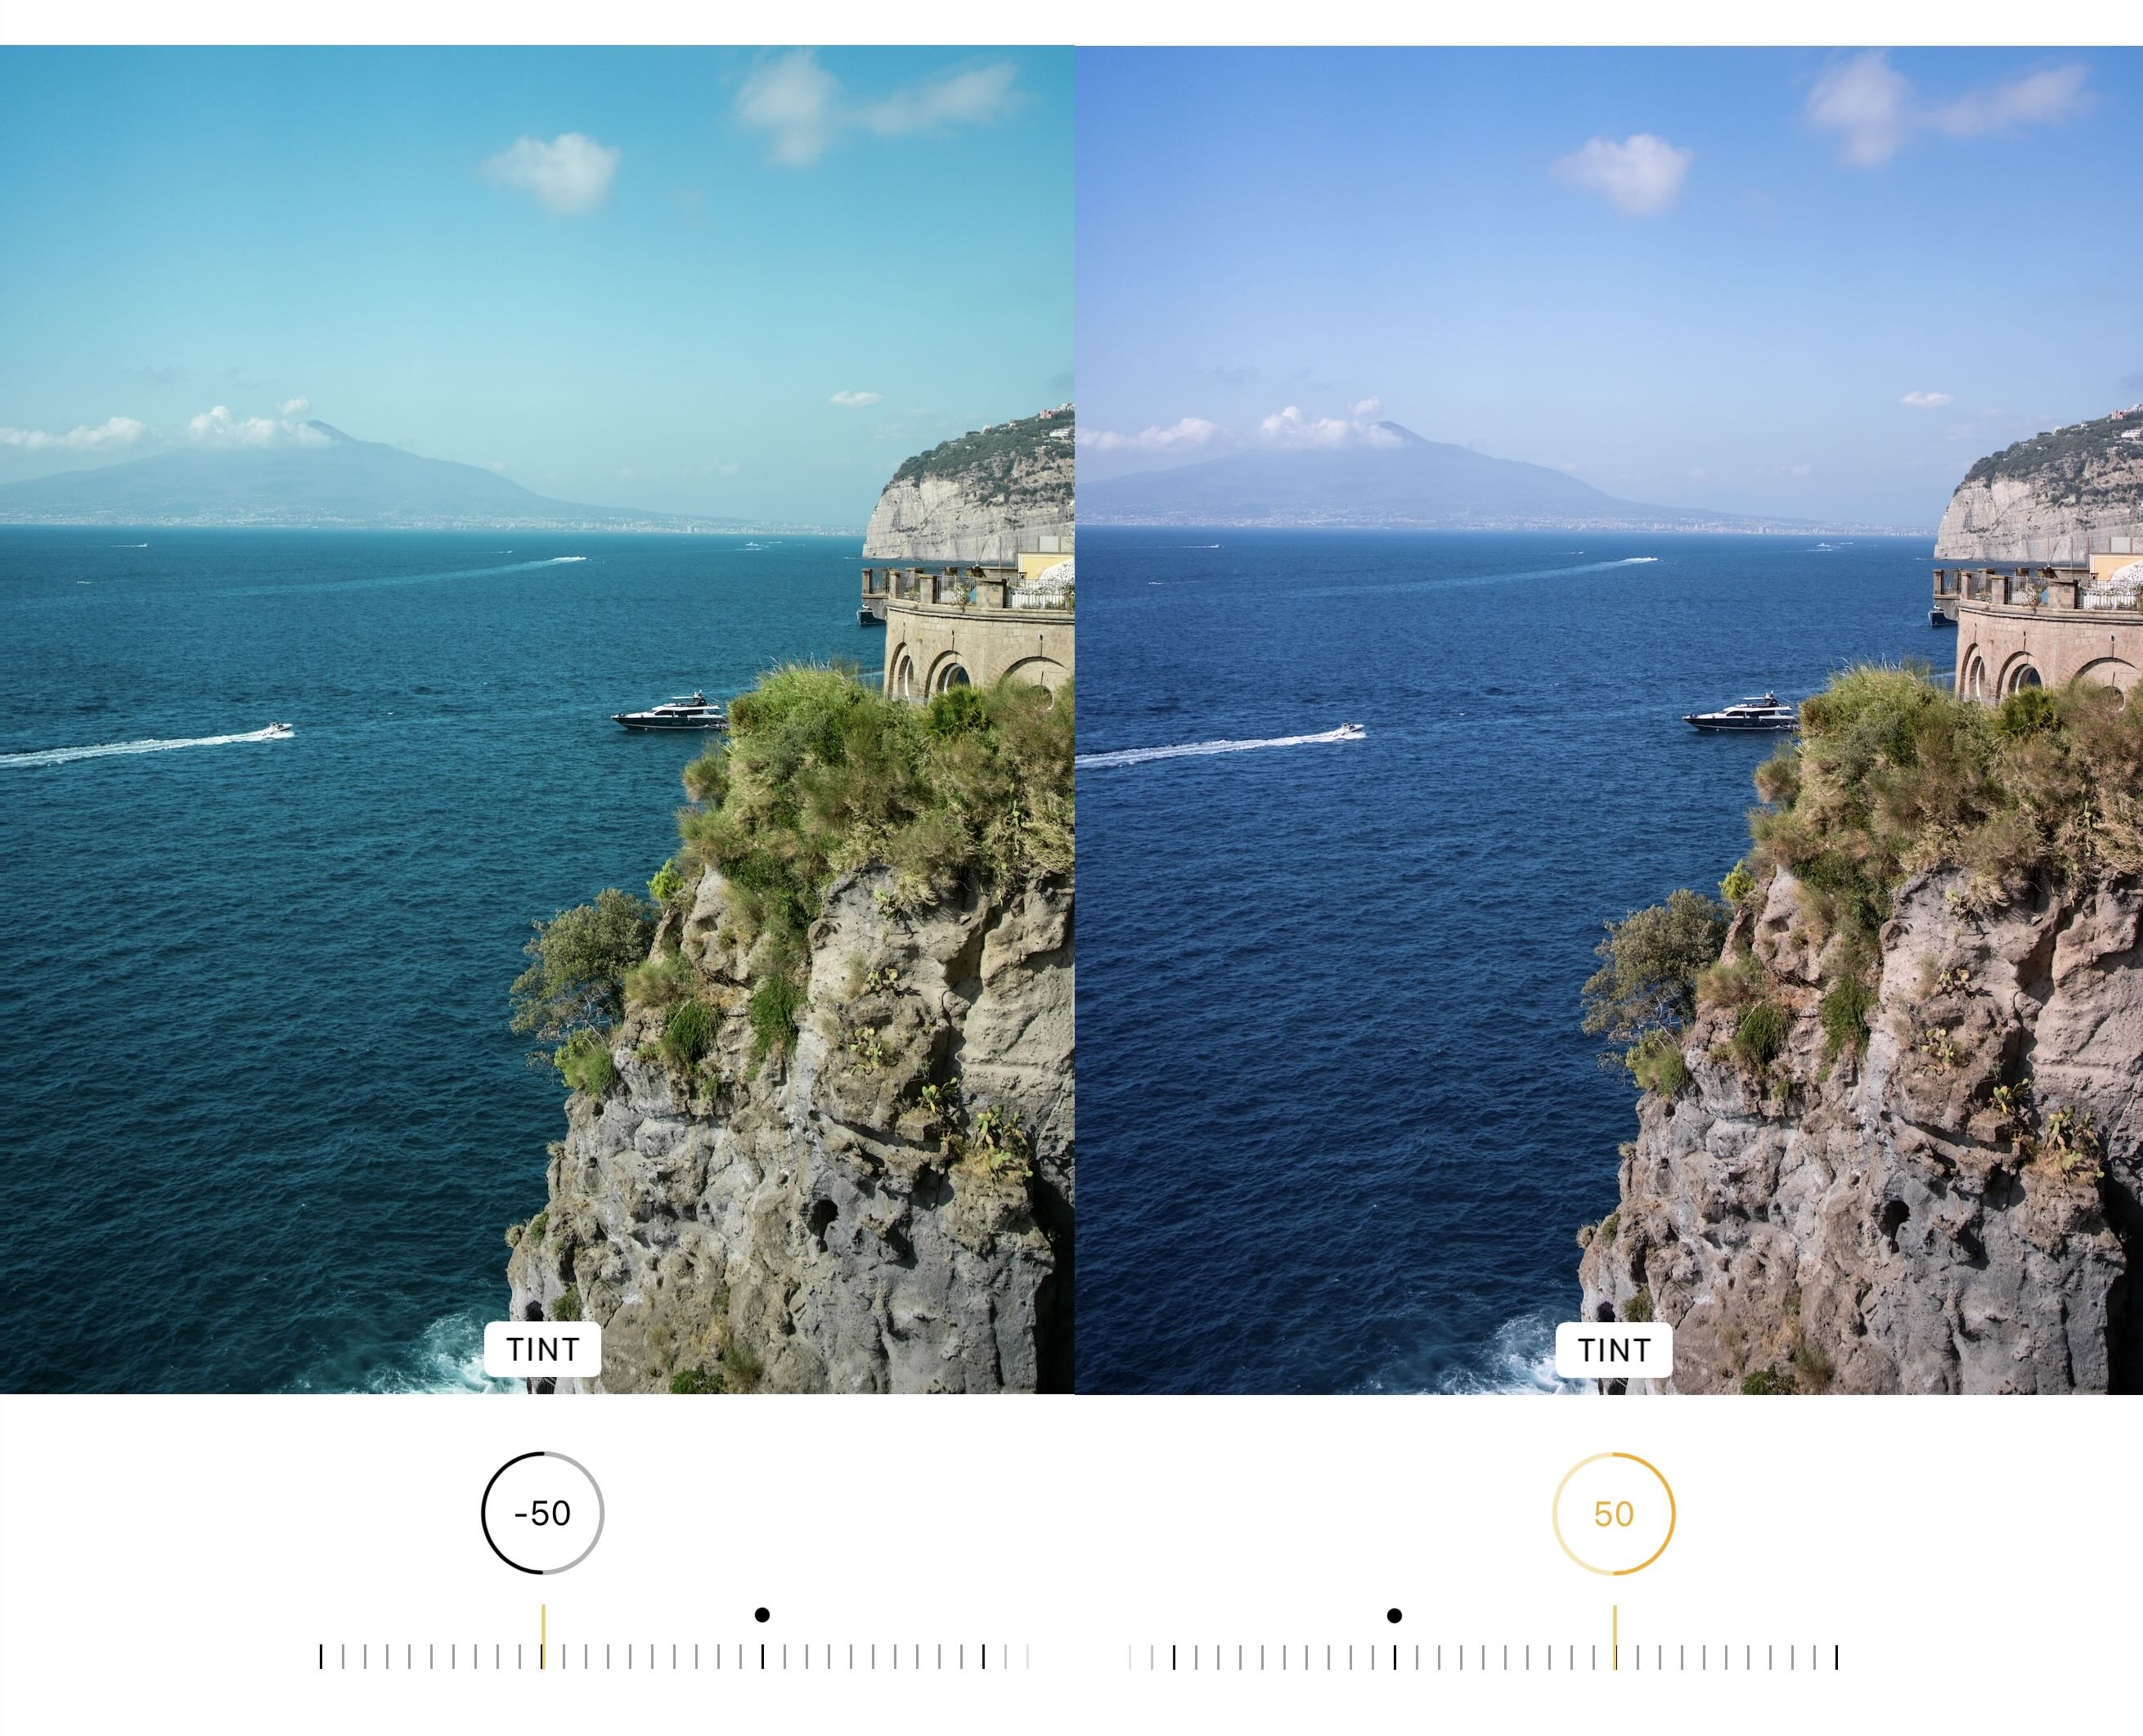
Tint
Tint shifts the image along the green ↔ magenta axis. It’s most useful when lighting creates a color cast that Warmth alone can’t fix, like fluorescent lighting pushing things green, or certain indoor LEDs pushing things magenta. Small movements go a long way here.
When to use this setting: use Tint when whites or skin tones look slightly green or magenta and you want to neutralize that cast.
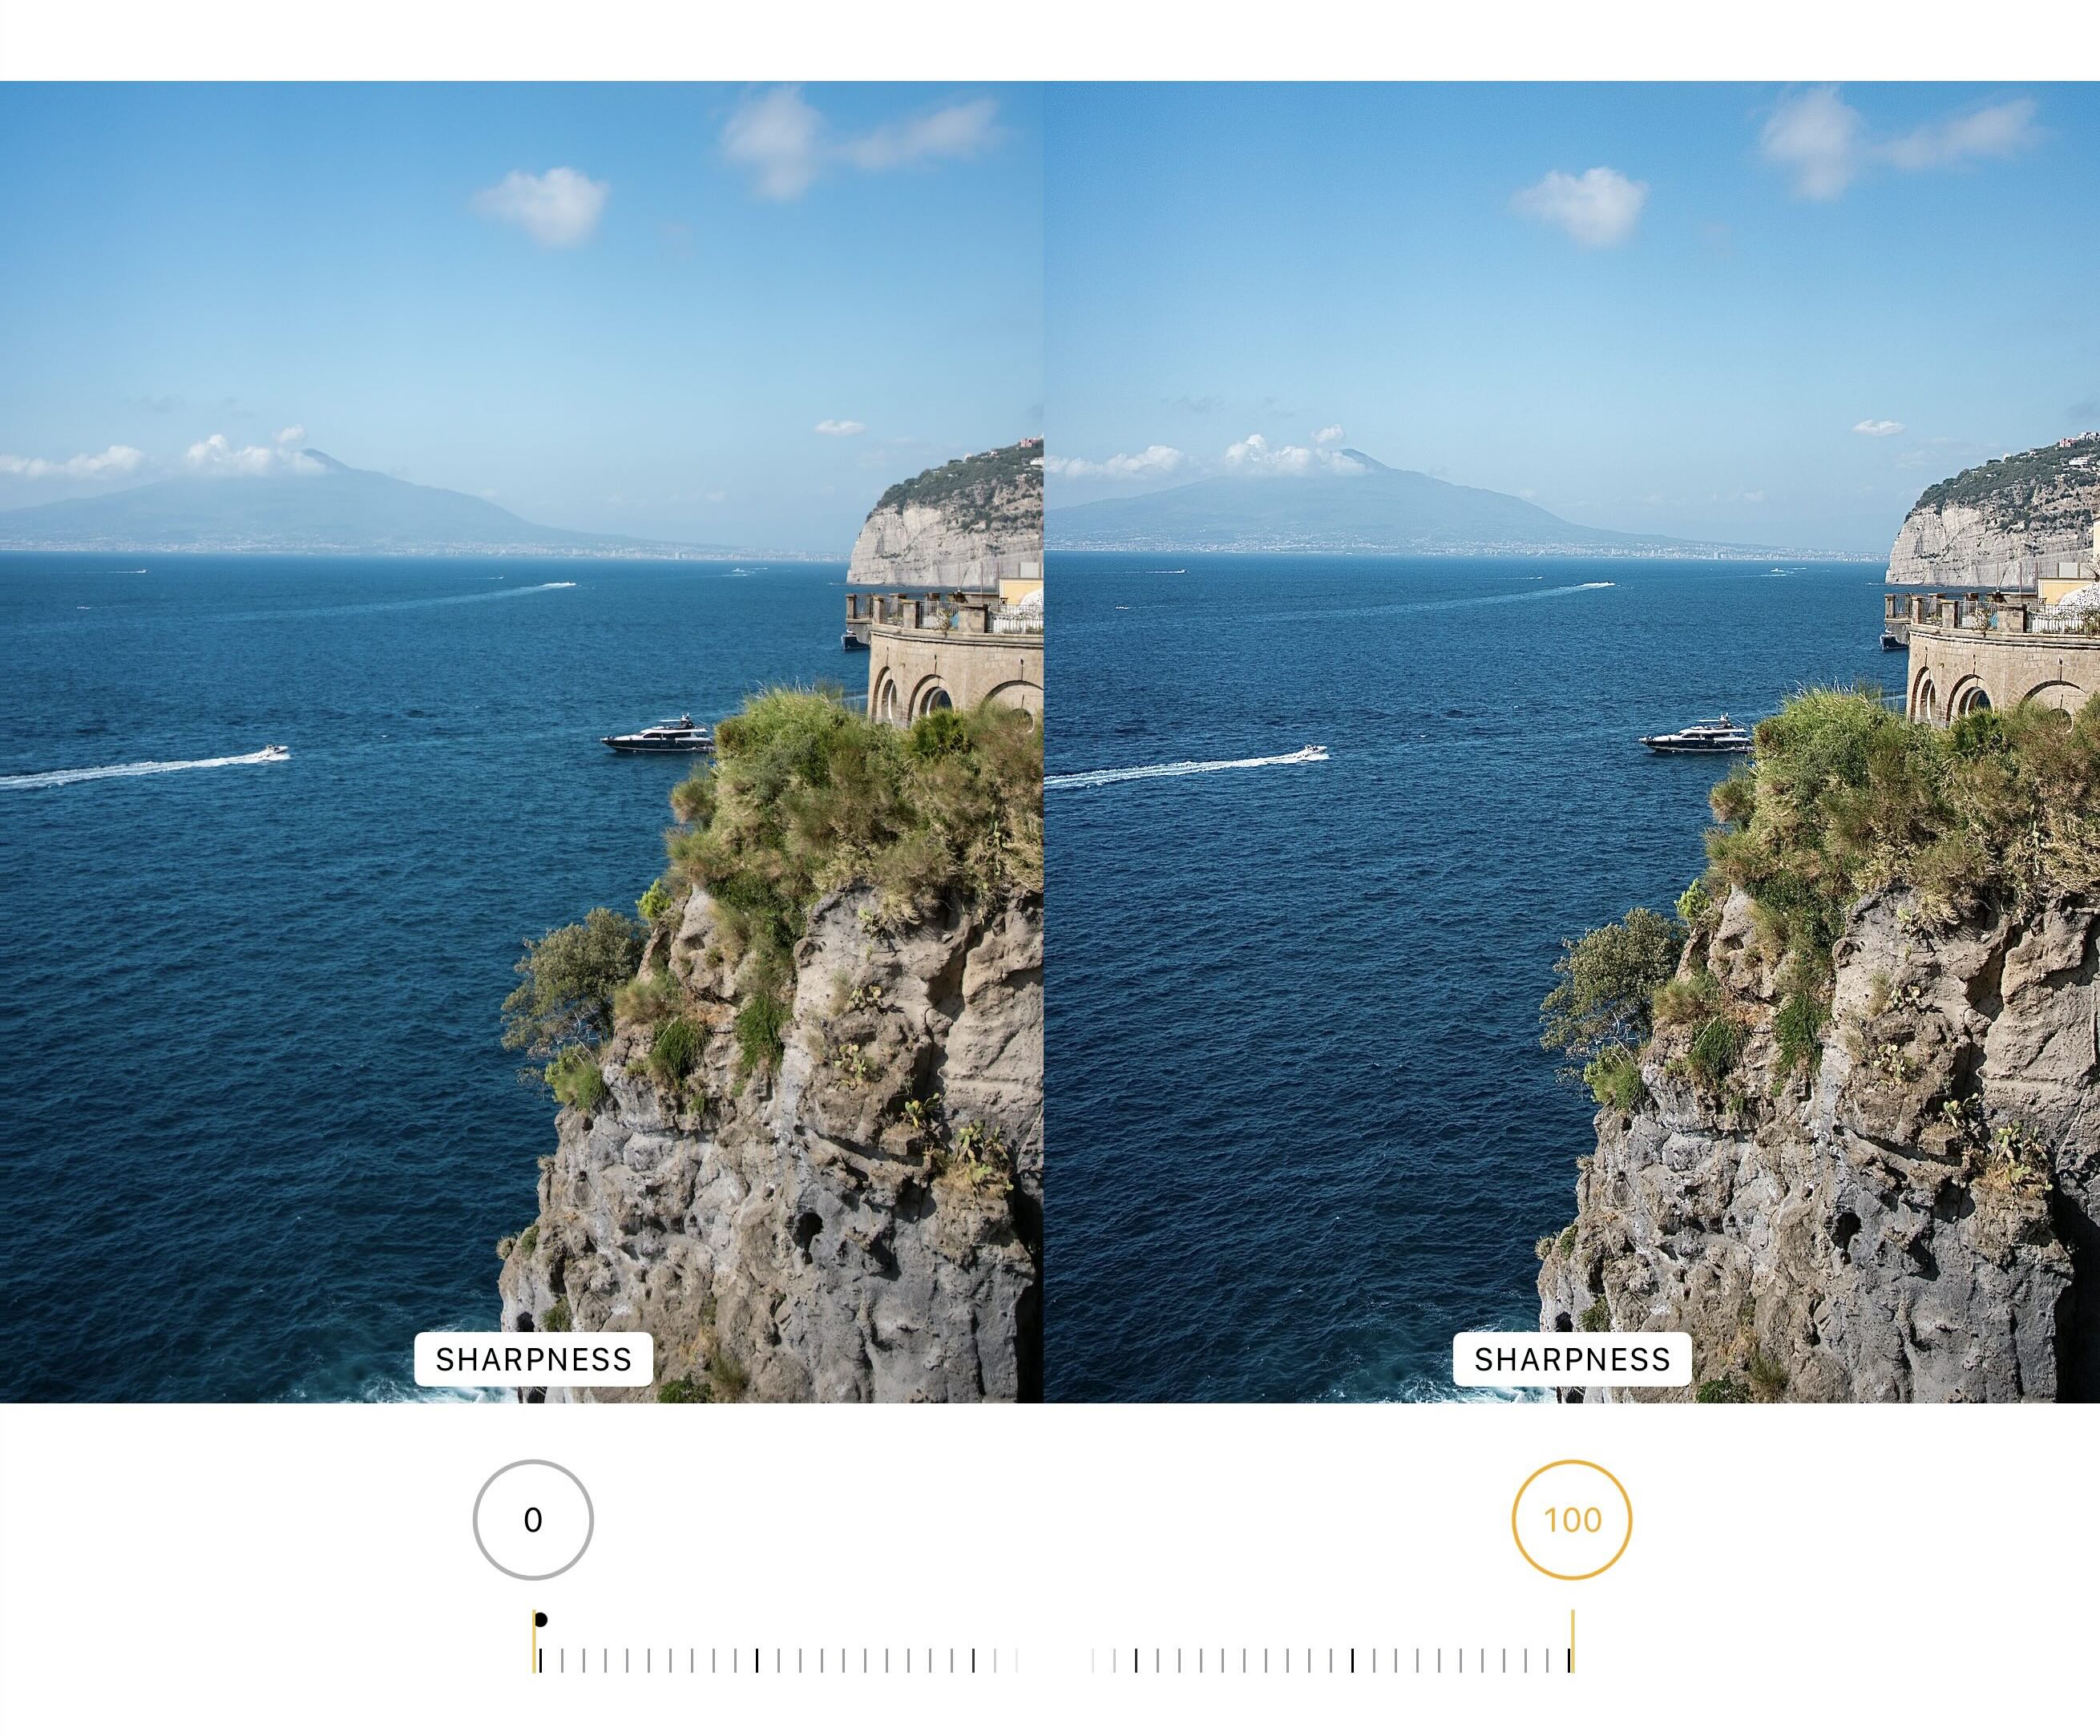
Sharpness
Sharpness enhances edge contrast so details appear crisper. It can help a slightly soft image look more defined, but it can also emphasize pores, noise, and compression artifacts if you push it too hard. If the photo is already clean and sharp, this slider can quickly make it look “crunchy.”
When to use this setting: use Sharpness when the photo looks a little soft and you want edges and fine textures to stand out.
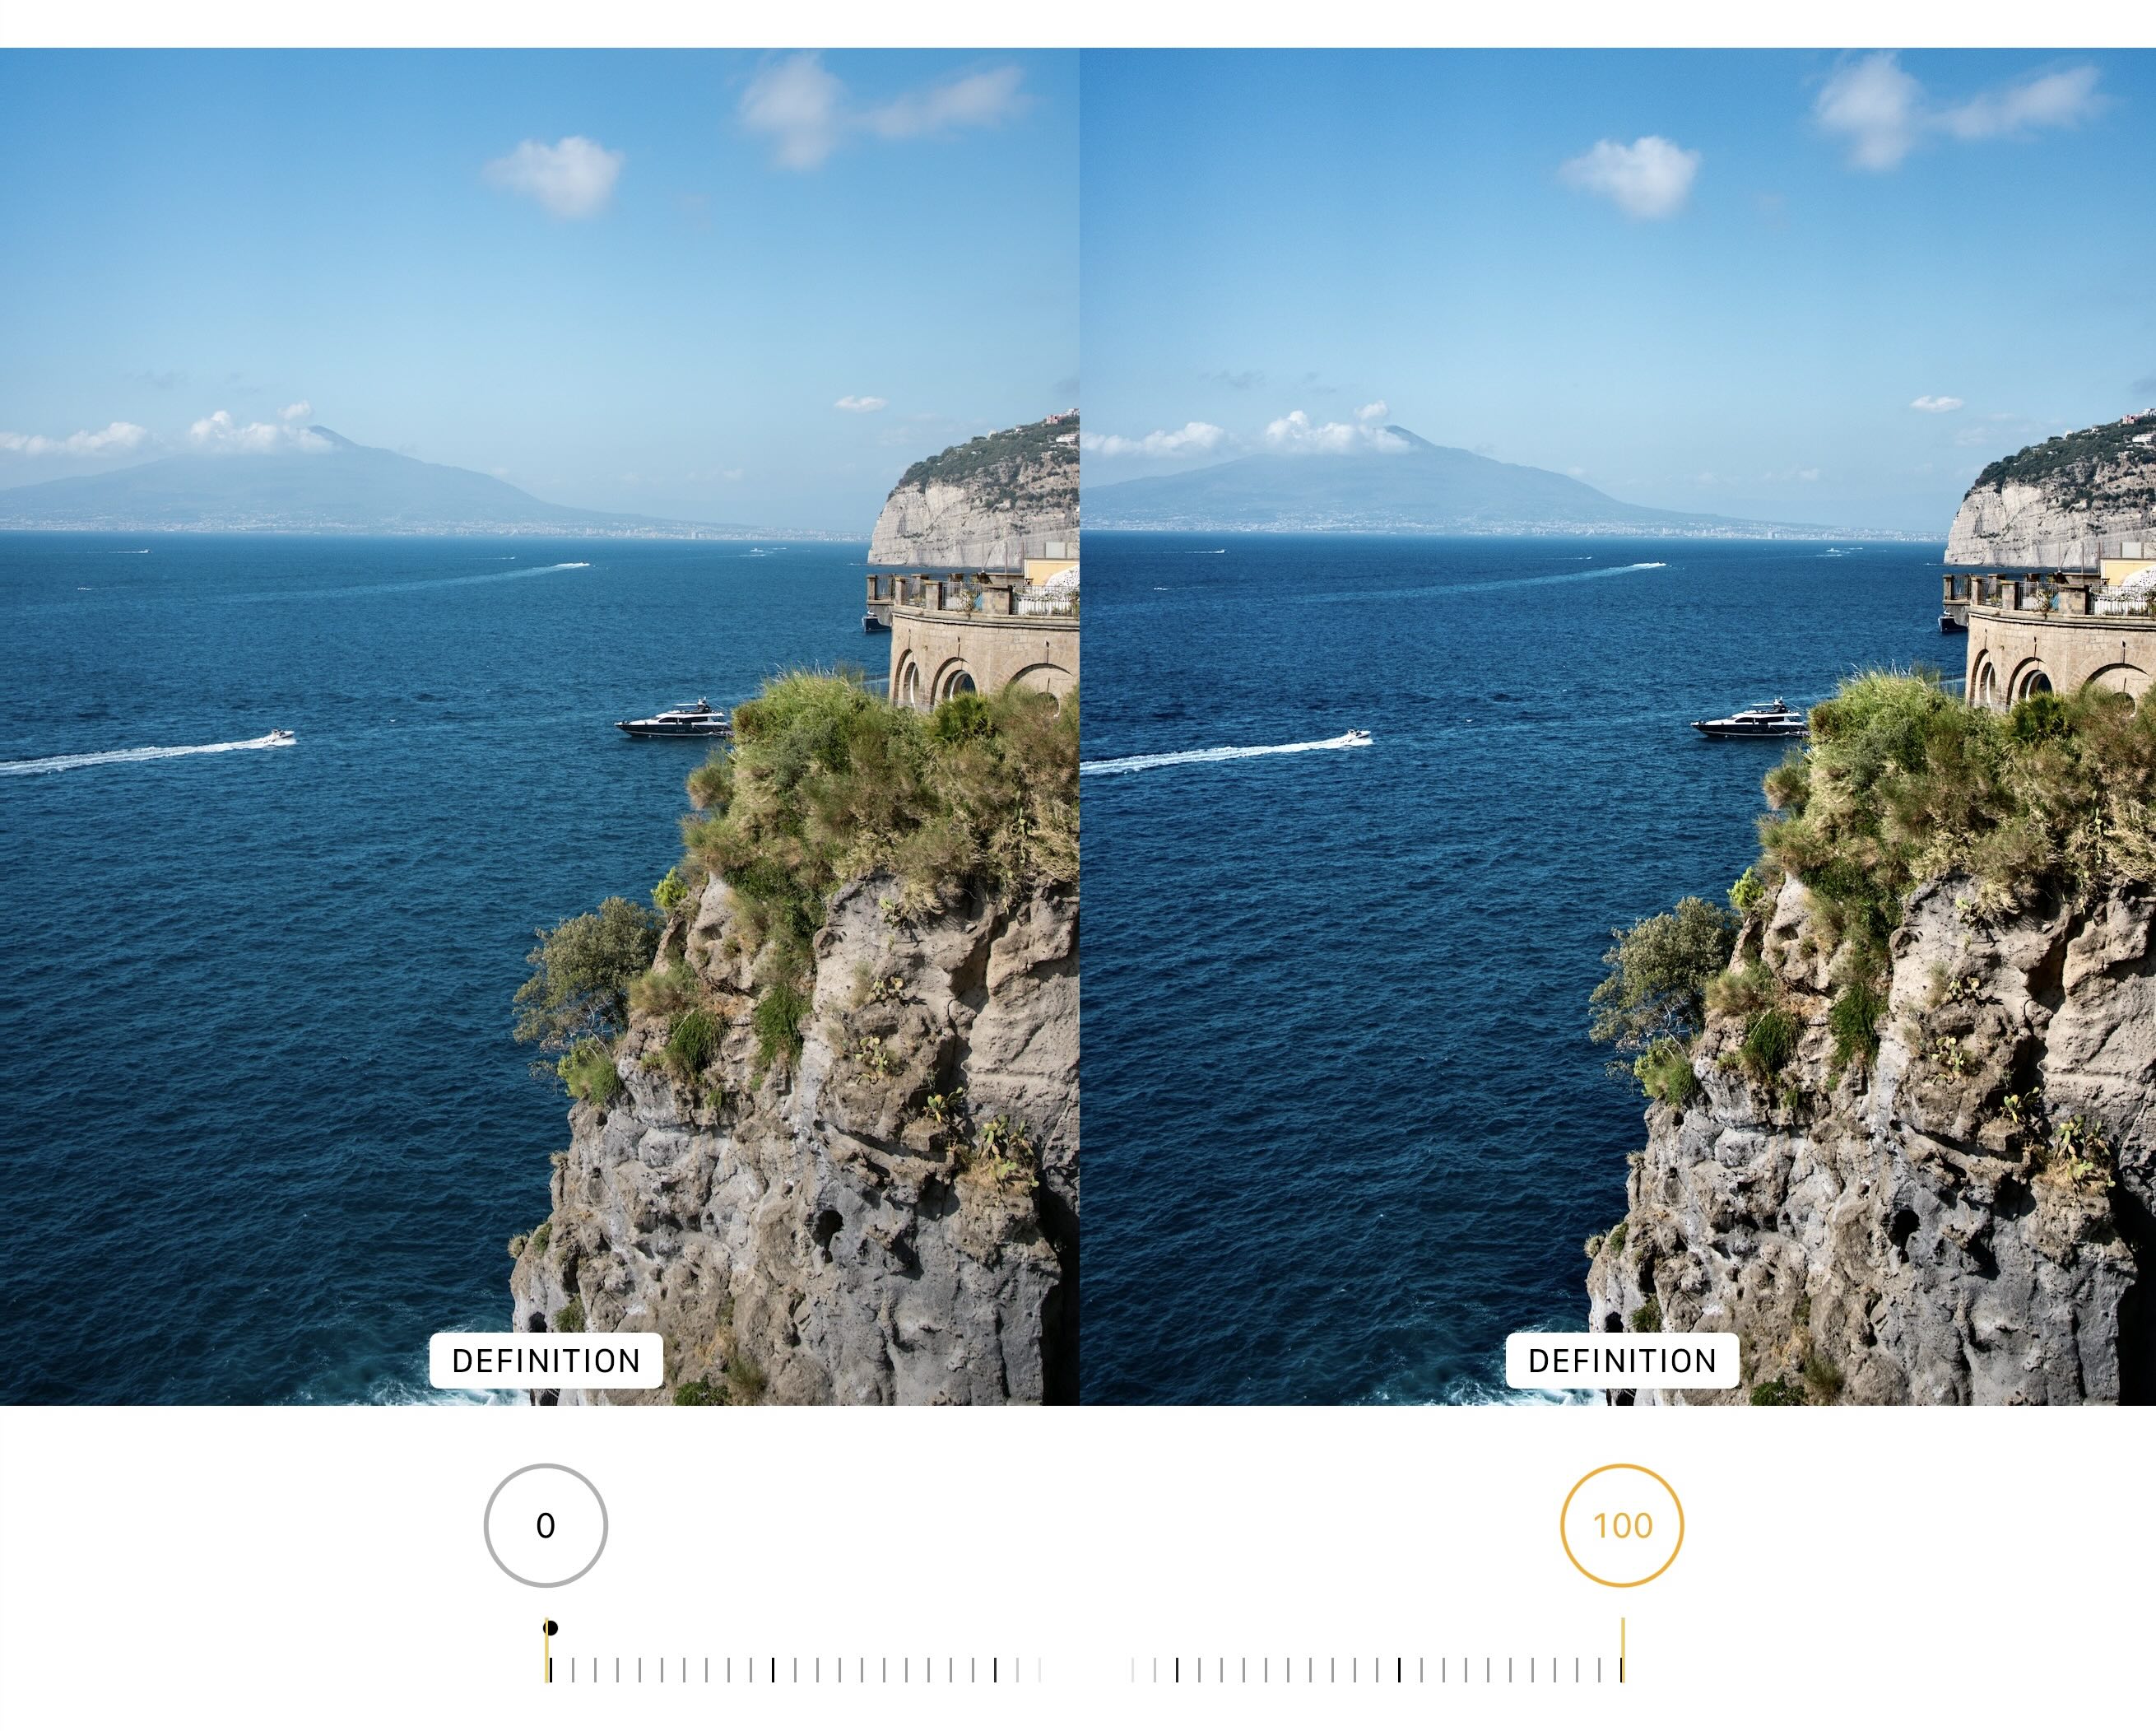
Definition
Definition adds clarity by sharpening edges while also increasing local contrast, which can create a stronger sense of depth and separation. Compared to Sharpness, Definition often feels less “grainy” and more like an overall clarity boost, which is especially helpful after you’ve cropped in or lifted shadows.
When to use this setting: use Definition when the image looks a bit “flat” or slightly soft and you want a clearer, more dimensional look.
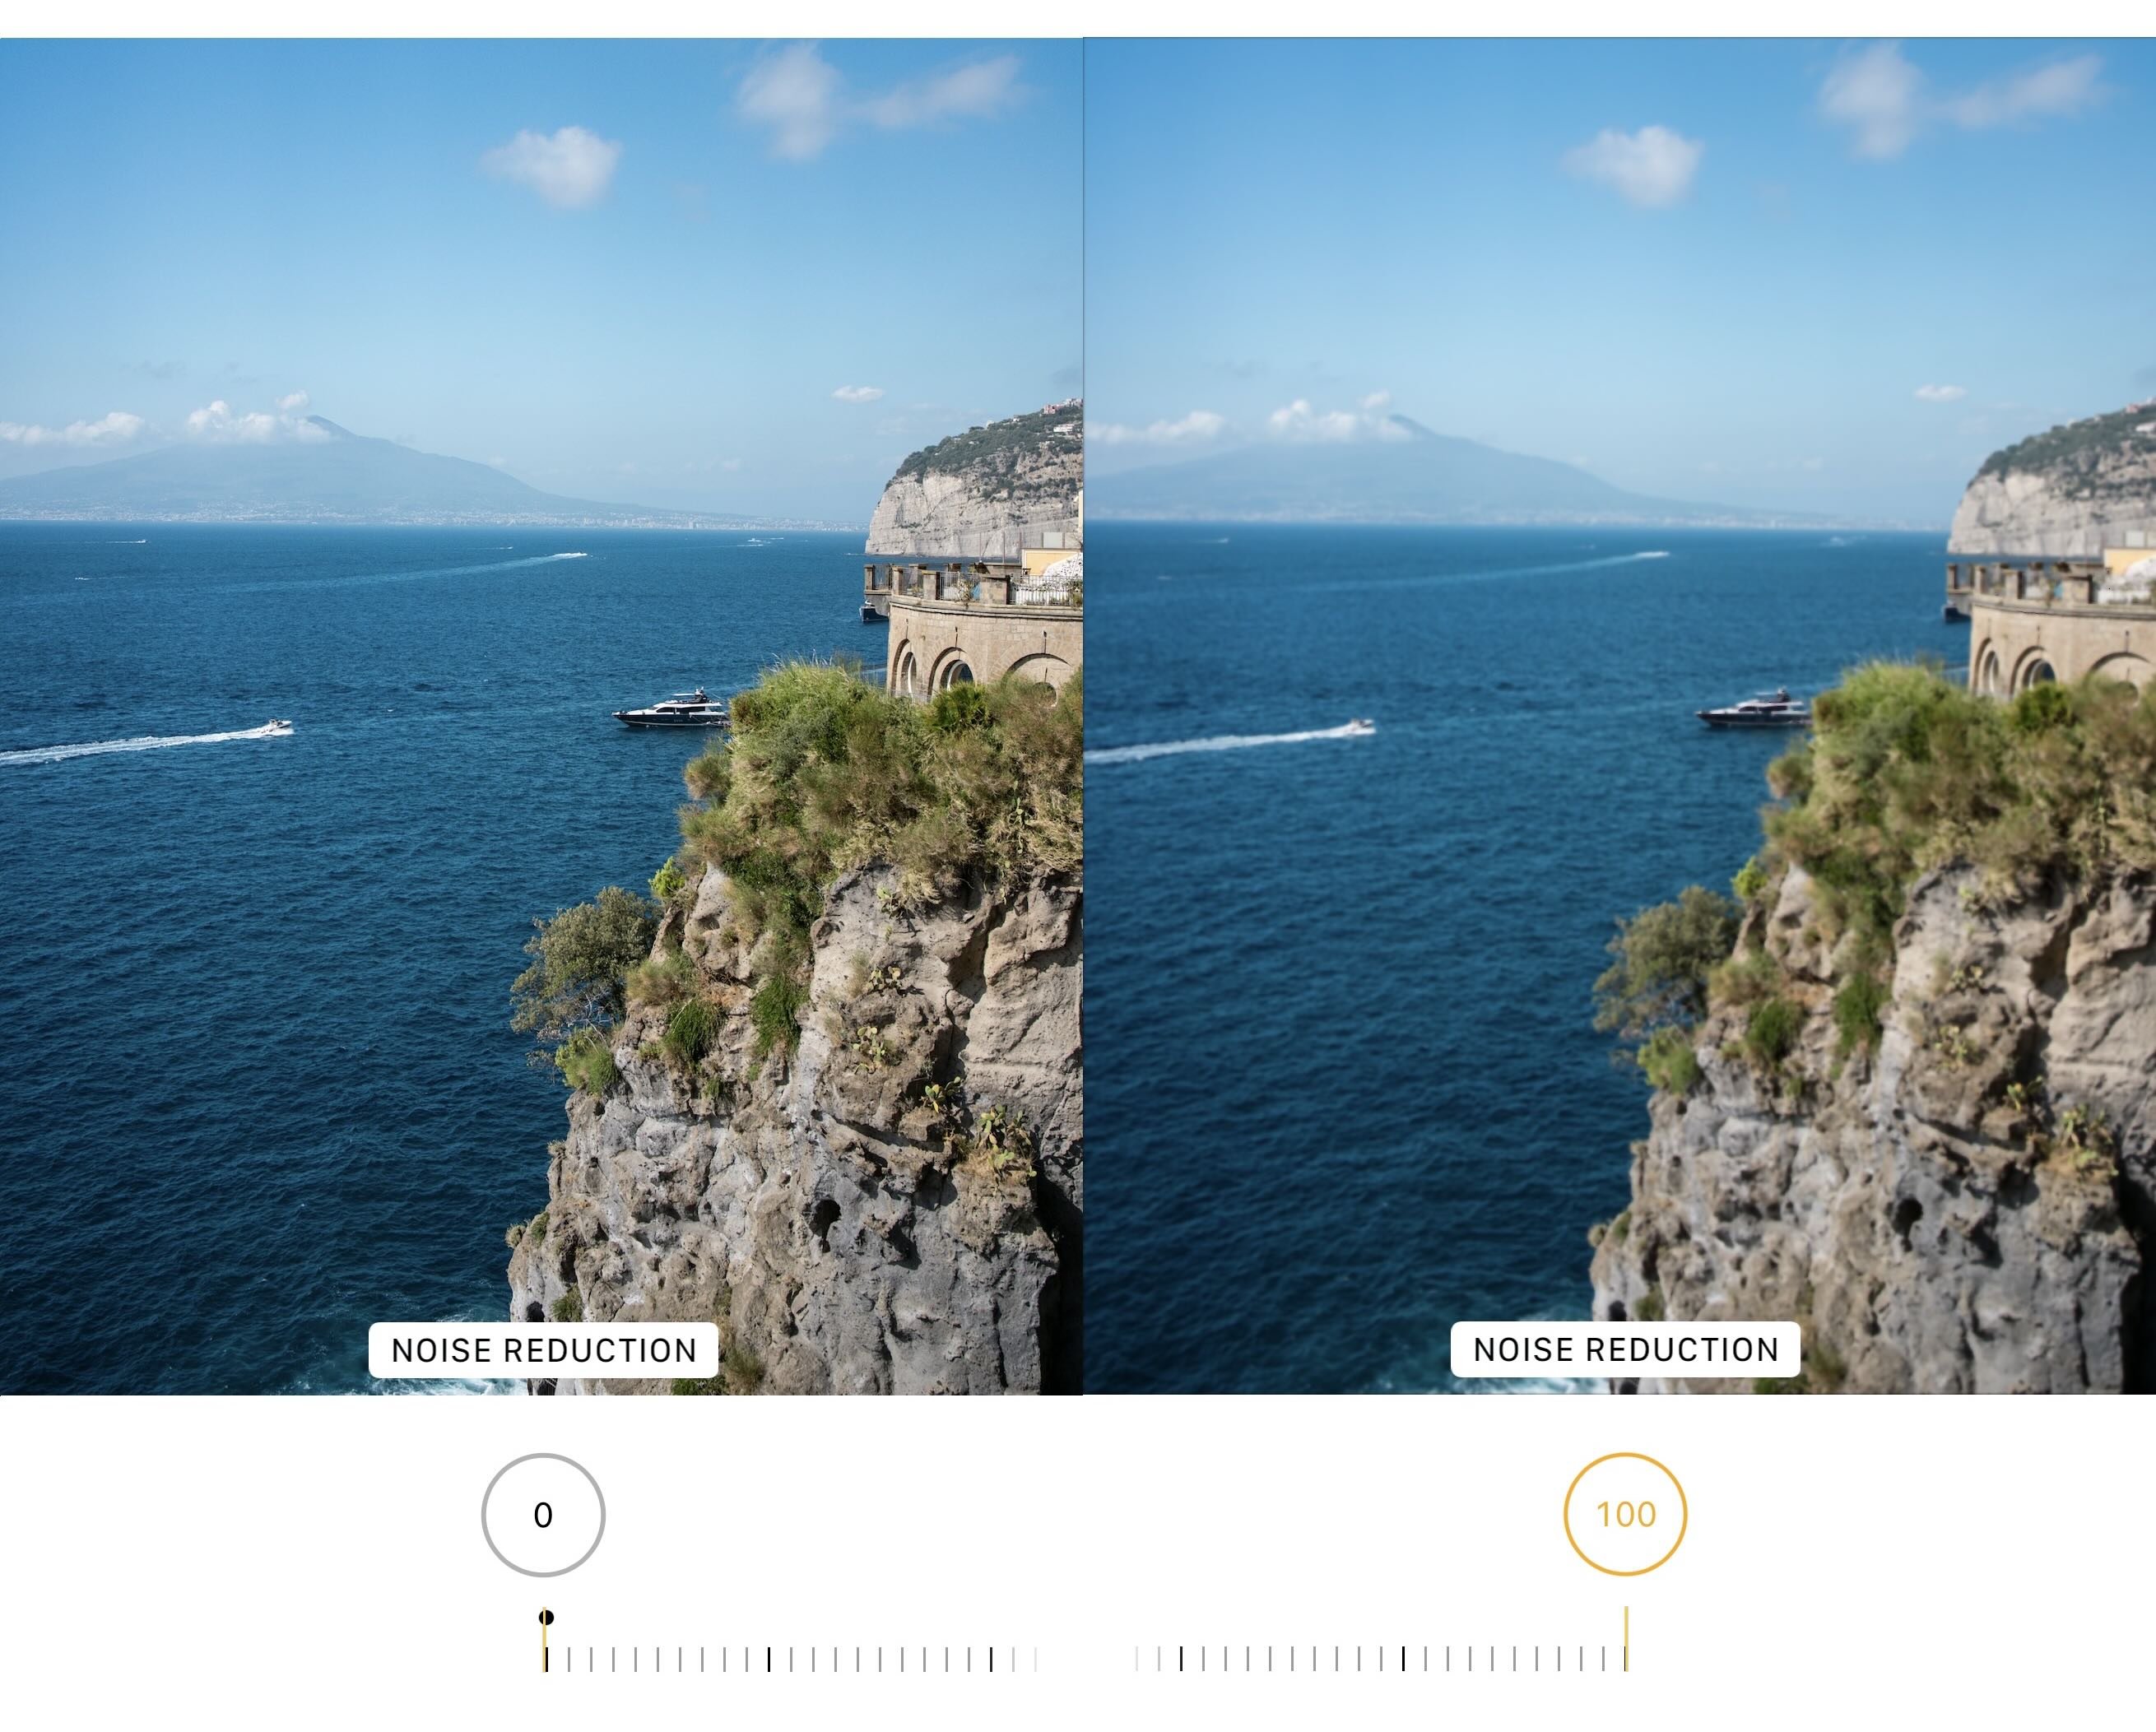
Noise Reduction
Noise Reduction smooths graininess and speckling - most common in low-light shots or images where shadows were lifted a lot. The tradeoff is that stronger noise reduction can also smear fine detail and make the image look plasticky if overused. A common workflow is to add a little noise reduction, then use a touch of Definition to bring back perceived crispness.
When to use this setting: use Noise Reduction when you see visible grain (especially in shadows) and you want a cleaner, smoother look.
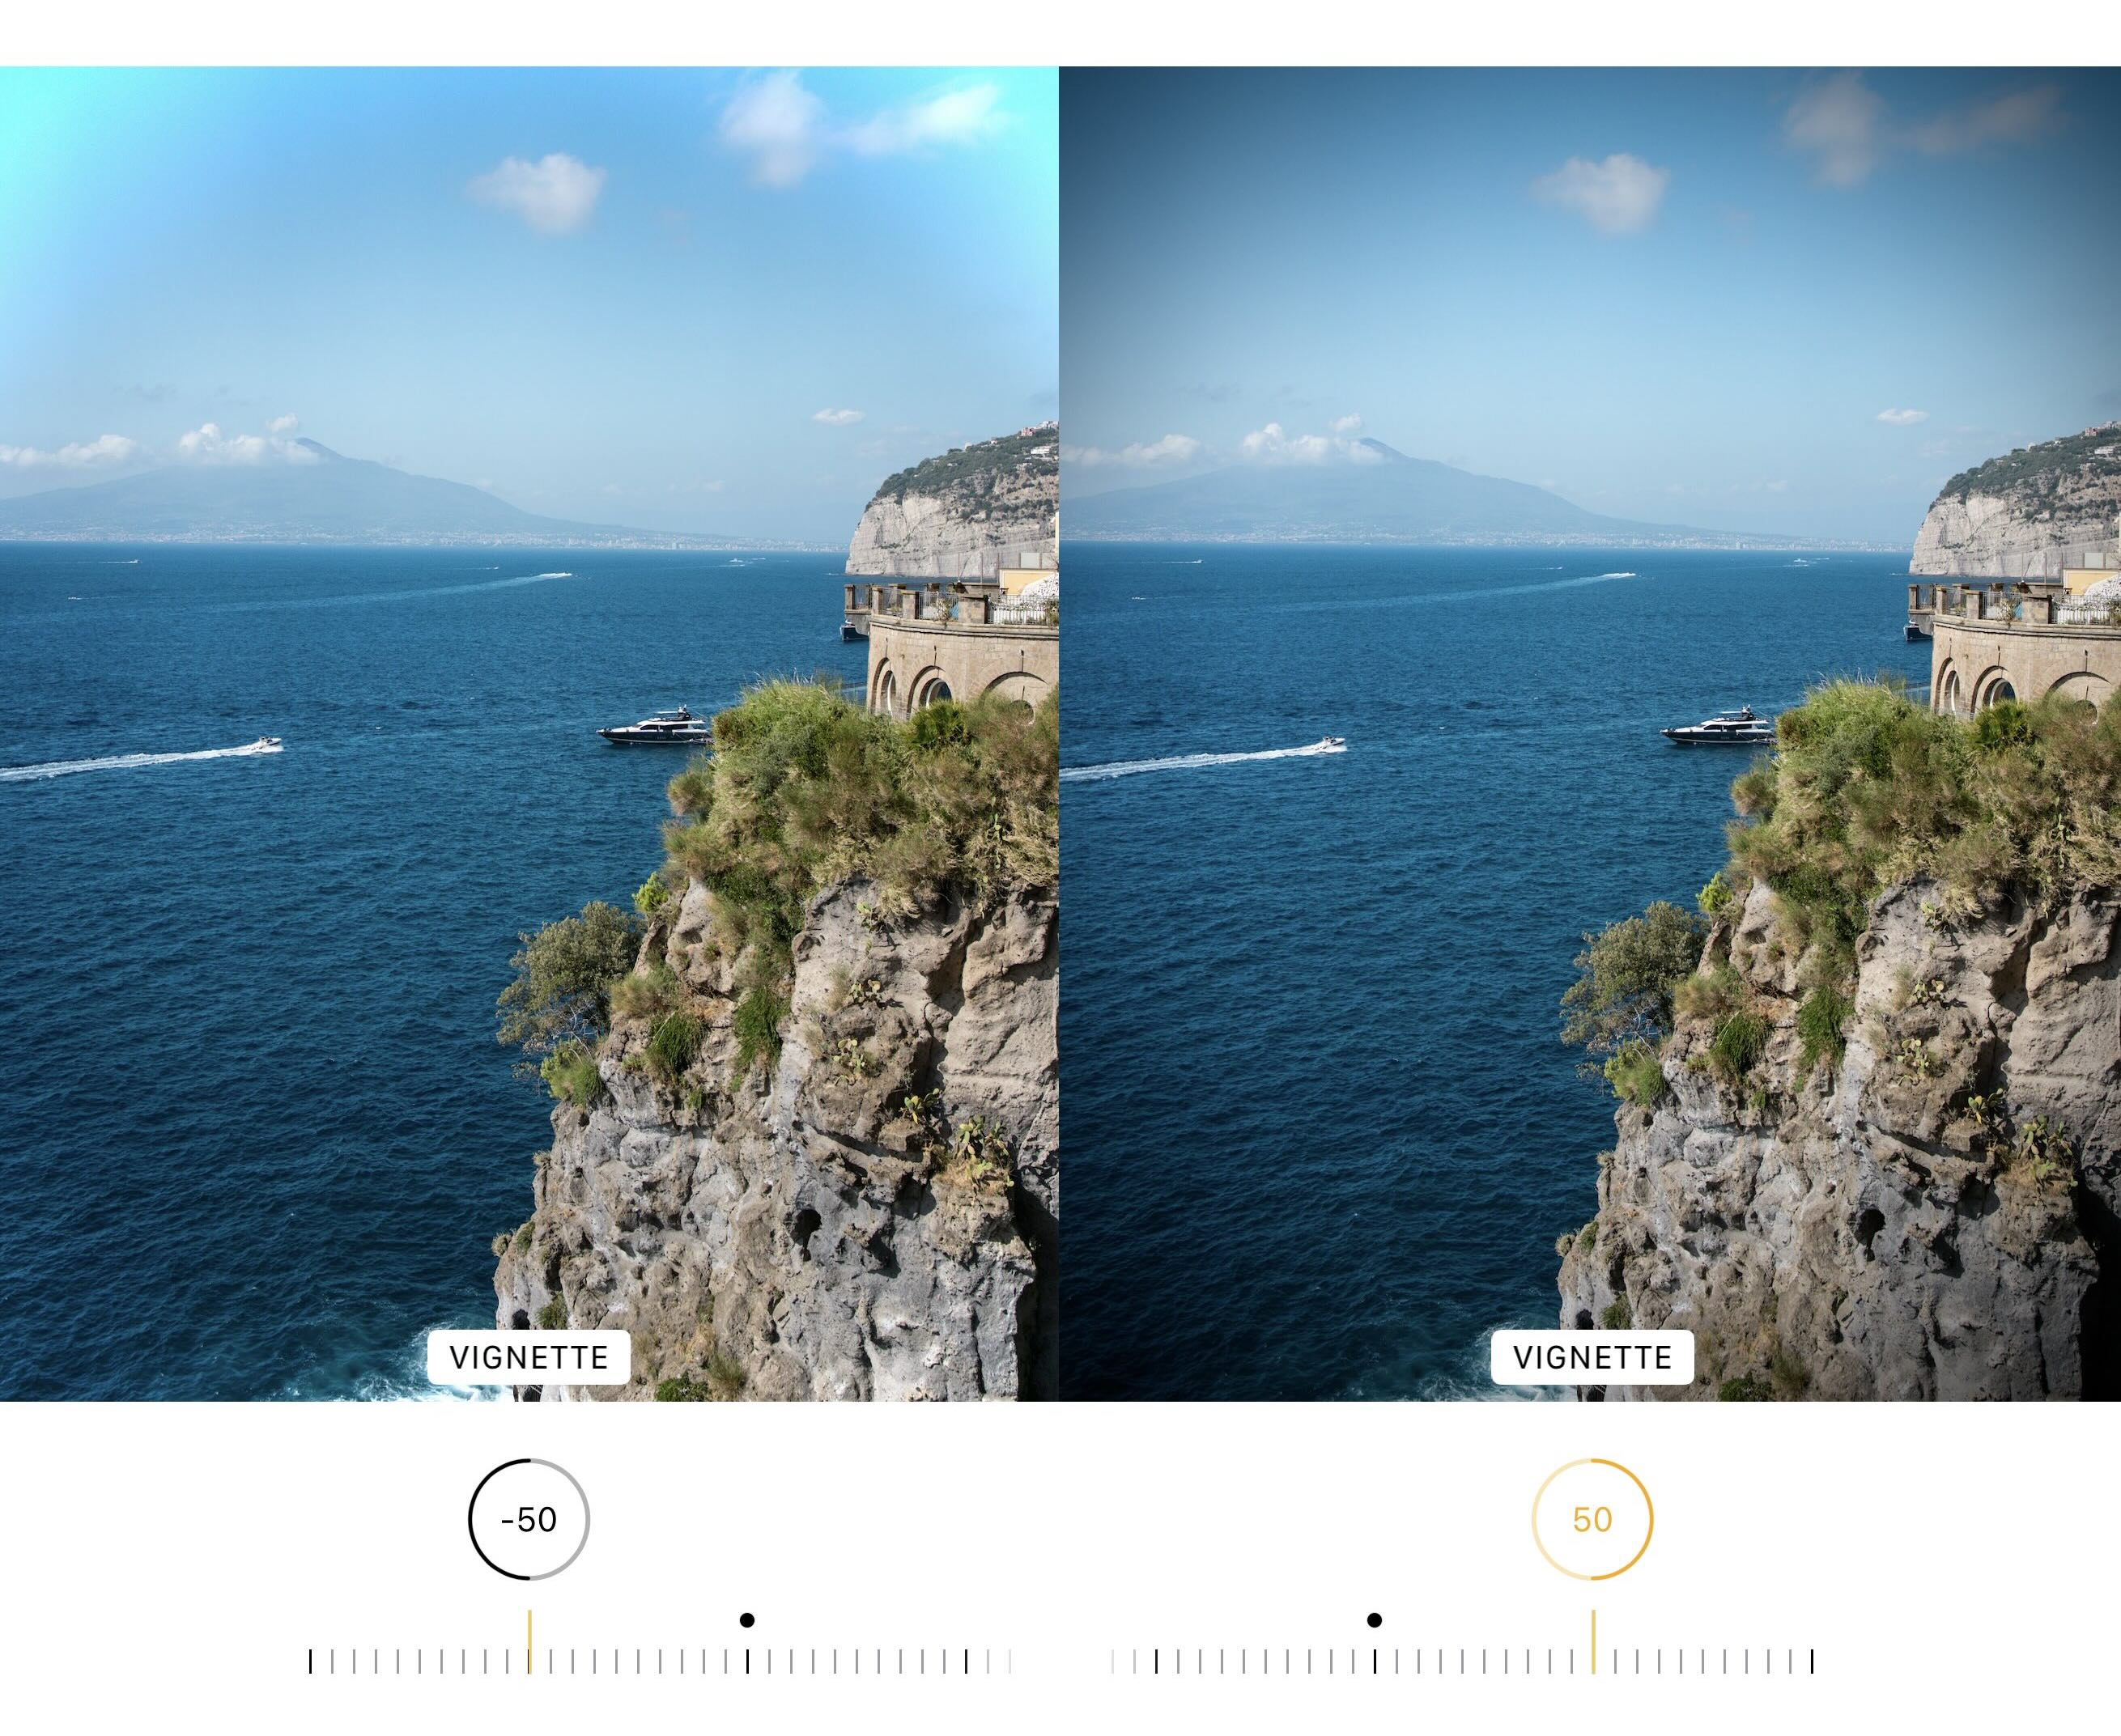
Vignette
Vignette darkens (or sometimes lightens) the edges of the image relative to the center, subtly pulling the viewer’s attention inward. A gentle vignette can add focus and mood; a heavy vignette can look stylized or retro. The key is restraint—most of the time you want people to feel it, not immediately notice it.
When to use this setting: use Vignette when you want to draw attention to the subject in the center and reduce edge distractions.
What Live is and how to adjust a Live Photo
A Live Photo is a photo that also captures what happens 1.5 seconds before and 1.5 seconds after you press the shutter, creating a short moment with motion (and often audio).
To edit it, open the Live Photo in Photos, tap Edit, then tap the Live button. From here you can:
- Set a Key Photo by scrubbing the frame viewer, selecting the best frame, and choosing Make Key Photo
- Trim the Live Photo by dragging either end of the frame viewer
- Mute or unmute the Live Photo’s sound
- Turn Live off to make it a still photo using the key frame
You can also apply Live effects from the photo view (not necessarily inside the same Adjust panel): Loop, Bounce, or Long Exposure, which can turn water into silky streaks or city motion into light trails. You'd do this by tapping "Live" located at the top left corner while you're not editing a photo (i.e. looking at a photo in the Photos app normally).
What's available in Crop
The Crop tool is where you fix composition and geometry, from framing to straightening and perspective.
Inside Crop, you can:
- Crop manually by dragging corners or pinching to frame what you want
- Unlock aspect ratio (the lock icon) if you want freeform cropping instead of keeping the original proportions
- Crop to preset ratios like Square, Wallpaper, 9:16, or 5:7
- Rotate the image in 90° steps
- Flip horizontally for a mirror effect
If your horizon is tilted or buildings look like they’re leaning, swipe to the geometry options under Crop to:
- Straighten (great for horizons)
- Adjust Vertical perspective (fixes “falling backward” buildings)
- Adjust Horizontal perspective (fixes skew from shooting at an angle)
A simple habit that makes Crop edits look professional: straighten first, then crop for composition, and only then decide whether you need perspective tweaks.